Difference between revisions of "Server Configuration"

From Holdfast: Nations At War
Jump to navigation Jump to search
 
(2 intermediate revisions by the same user not shown)
Line 722: Line 722:
 
spawn_override B Rifleman 200
 
spawn_override B Rifleman 200
 
</pre>
 
</pre>
 +
 +
'''exclusive_modded_uniforms'''
  
 
Similarly, administrators have the ability to allow users to only spawn with modded uniforms.
 
Similarly, administrators have the ability to allow users to only spawn with modded uniforms.
  
 
''Note: You will need a modded uniform for each class you want to spawn, as base game uniforms will not be available.''
 
''Note: You will need a modded uniform for each class you want to spawn, as base game uniforms will not be available.''
;<code>'''exclusive_modded_uniforms <true/false>'''</code>
 
  
 +
You can either set this command's value to "true" for it to apply to all factions, or else you can list only the factions you want to use modded uniforms for.
 +
 +
For example, to only apply mod exclusive uniforms for the British and French factions you can use:
 +
;<code>'''exclusive_modded_uniforms british french'''</code>
 +
;
 
To use these commands, it must be added after <code>!map_rotation start</code> and before <code>!map_rotation end</code>.
 
To use these commands, it must be added after <code>!map_rotation start</code> and before <code>!map_rotation end</code>.
  

Latest revision as of 12:49, 19 November 2024

Server Configuration Files

Example Configuration File

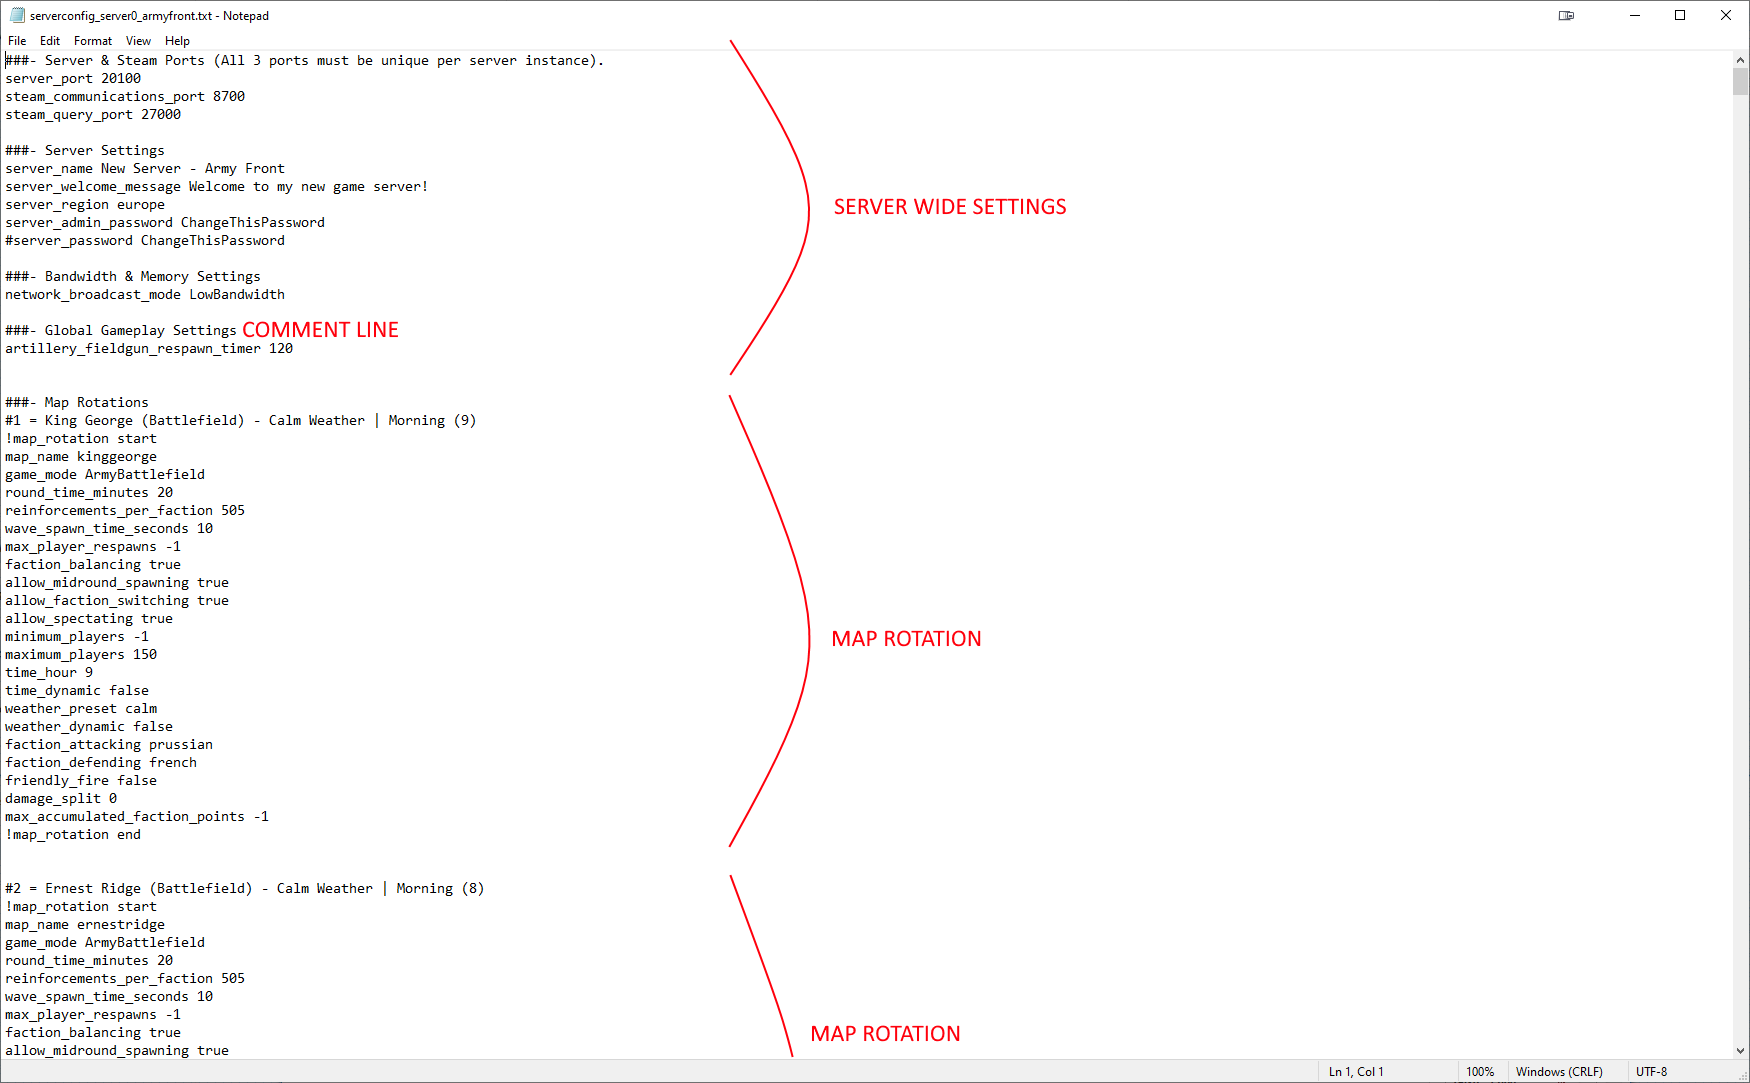
Server configuration files are plain text files containing settings defining the server setup and the maps/game modes available in rotation. There are three types of line to be found in a configuration file:

  • Setting lines, of the form <setting> <value>. These are the important part of the file.
  • Comment lines, starting with a # character. These lines are ignored. These are useful to annotate your settings, or to keep a list of map rotations at the top of your config file for reference.
  • Empty lines, used for layout / spacing. These lines are ignored.

The general layout of a configuration file is to have all server-wide settings at the top of the file, followed by a list of map rotation settings. See the image on the right. Further examples are included with the server download (see Server Hosting).

Server-Wide Settings

These settings define how the server is visible to users, how it communicates with the server browser, and any restrictions on the server.

First up are the port settings. These are mandatory, and all must be unique per server instance on the same box.

server_port 20100
steam_communications_port 8700
steam_query_port 27000

Next are the settings defining how the server displays to players:

server_name New Server - Army Battlefield
server_welcome_message Welcome to my new game server!
server_region europe
server_admin_password ChangeThisPassword
#server_password ChangeThisPassword
server_intro_title Welcome to my server!
server_intro_body Greetings fellow humans

The server_password is optional and can be left commented out. The server_admin_password is used for Remote Console Commands. The into and title will define a message to pop up on joining the server. The server_region can take one of the following values, resulting in the appropriate region being displayed in the server browser:

europe usa usaeast usawest australia
china japan russia southkorea brazil

The broadcast mode determines the network utilisation for close range combat.

Parameter Usage
LowBandwidth Reduced packet rate on close-range (high player count). This is the default mode.
HighAccuracy Increased packet rate on close-range (low player count)
Balanced Balanced is in between LowLatency and HighAccuracy and should also be rather playable on big player servers running high-end machines.
UltraHighAccuracy A slightly less performance-intensive version of RealTime. This setting is recommended only for Melee. It can support higher player counts than RealTime.
Realtime Realtime outputs even more bandwidth then HighAccuracy and should only be used on Melee Arena where the player numbers don't exceed a high count.

Example

network_broadcast_mode LowBandwidth

The respawn time for artillery can be defined in seconds. Both default to 2 minutes.

artillery_fieldgun_respawn_timer 120
artillery_rocketlauncher_respawn_timer 120

Enable the anti-griefing mechanics for artillery pieces:

antigriefing_enabled false

These settings control the player thresholds for determining which maps are available in the rotation for low/med/high player counts. This is useful to restrict certain maps when server populations do not suit them. The default values are below.

population_low_min_players 30
population_medium_min_players 50
population_high_min_players 100

You can enable / disable performance warnings with this settings:

show_serverperformance_warning true

Map randomisation can be enabled with:

map_rotation_start_randomise true

You can change the amount of people it takes to capture objectives on flag based gamemodes. There are multiple commands that will change depending on how many people are on the server and playing.

conquest_stealthcap_reqplayers_verylow 0
conquest_stealthcap_reqplayers_low 2
conquest_stealthcap_reqplayers_medium 3
conquest_stealthcap_reqplayers_high 4

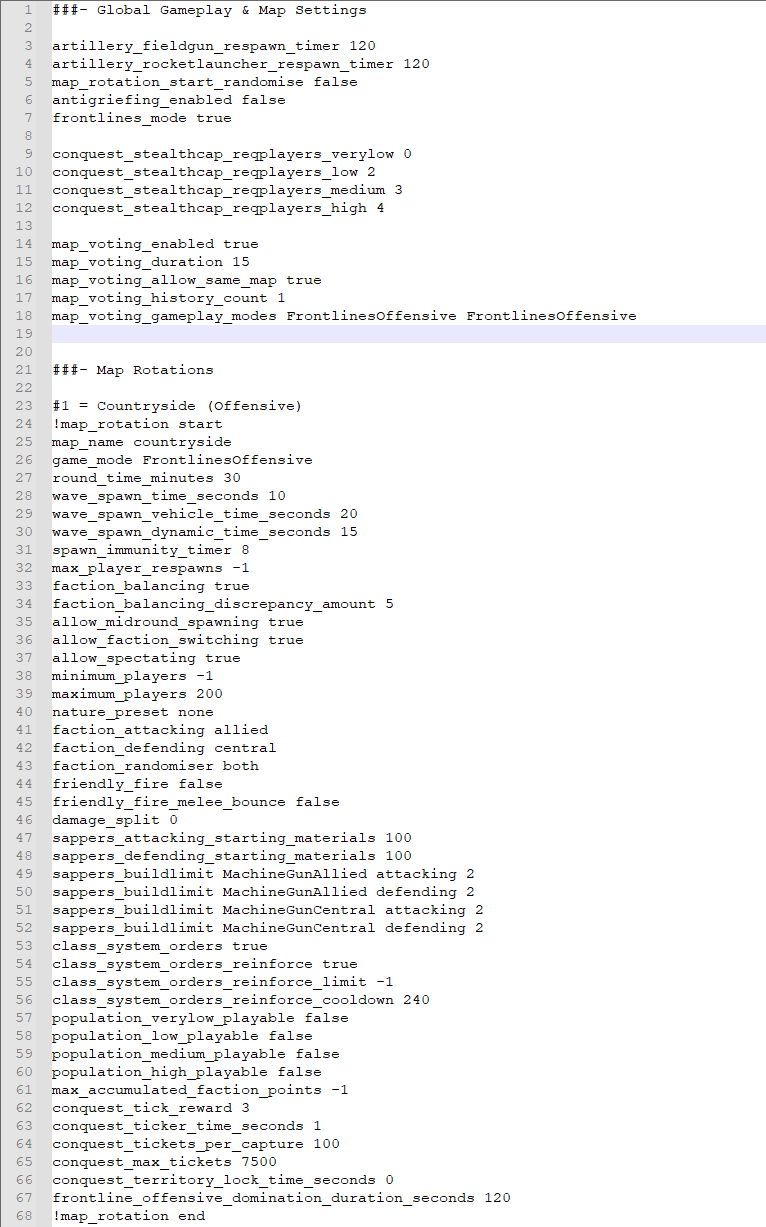
Frontlines specific commands

Use this command as true to set the game type to Frontlines. Defaults to false.

Example frontlines config
frontlines_mode true

Auto Shutdown/Restart System

An auto-shutdown and auto-restart system has been introduced that can be configured either in the configuration file or using the VapuriLoadTester launcher.

Auto Shutdown

The game server takes care of shutting itself down after a specified number of minutes. This feature doesn’t require the explicit use of the VapuriLoadTester (VLT) program to function. This will also close the VLT server helper program upon shutdown.

Define the time after when a server will shut down pending on your set number of minutes.

server_autoshutdown_interval_minutes 240

Server will not wait for the round to finish in the ‘Auto-Shutdown System’ and will instead proceed with the shutdown after the ‘autoshutdown_interval’ + ‘autoshutdown_overtime’ has been exceeded. Ensure that this interval allows enough time for players to be informed of the server shutdown through broadcast messages.

server_autoshutdown_overtime_minutes 10

Define the message you want to broadcast to the players in the server informing them that the server will be shutting down.

server_autoshutdown_broadcasted_message Server will be shutting down.

Define the interval broadcast messages will be outputted at.

server_autoshutdown_broadcasted_message_interval_minutes 2

Auto Restart

The game server takes care of restarting itself every specified number of minutes. This feature doesn’t require the explicit use of VapuriLoadTester (VLT) program to function.

Defines the time after when a server will shut down pending on your set number of minutes. Server will always wait until the round is complete before proceeding with the restart.

server_autorestart_interval_minutes 320

Server will not wait for the round to finish in the ‘Auto-Restart System’ and will instead proceed with the restart after the ‘autorestart_interval’ + ‘autorestart_overtime’ has been exceeded. Ensure that this interval allows enough time for players to be informed of the server restart through broadcast messages.

server_autorestart_overtime_minutes 10

Define the message you want to broadcast to the players in the server informing them that the server will be undergoing a restart.

server_autorestart_broadcasted_message Auto restart at the end of the round.

Define the interval broadcast messages will be outputted at until the round ends.

server_autorestart_broadcasted_message_interval_minutes 2

Map Rotations

A number of example configuration files are provided with the Holdfast server files. Studying these is the best way to understand the different map rotations.

Additionally, Big Mamba has compiled a list of AGS-made configuration files to use as examples. The github link to them can be found: here.

Basic Map Settings

In Progress

map_name game_mode game_type round_time_minutes ships_respawn_timer allow_midround_spawning allow_faction_switching allow_spectating max_player_respawns deathmatch_max_kills reinforcements_per_faction minimum_players maximum_players melee_weapons_only faction_balancing faction_balancing_discrepancy_amount max_accumulated_faction_points ships_preset faction_attacking faction_defending max_tickets ships_spawn rowboat_cooldown_timer rowboat_cooldown_while_sinking_timer ships_spacemode sappers_buildlimit sappers_attacking_starting_materials sappers_defending_starting_materials max_player_respawn officers_spawn_mounted

Spawn wave timers can be configured with the following commands. Their defaults are shown below. Vehicle is for Cavalry units, dynamic is for Frontlines tables.

wave_spawn_time_seconds 10
wave_spawn_vehicle_time_seconds 20
wave_spawn_dynamic_time_seconds 15

You can also enable spawn immunity up to a maximum of 5s with.

spawn_immunity_timer 5

Melee Arena Settings

You can set the time that players have to spawn into the round for the first round of the gamemode, this is recommended to be a higher value to allow players to load the map and spawn in for the first round.

round_spawn_close_timer_seconds 45

You can set the time that players have to spawn into the round and wait for the next round to start. This is for all rounds after the first round of the map. This is recommended to be a lower value to avoid long waiting times between rounds.

round_spawn_close_timer_seconds_between_rounds 15

You can set the number of rounds required to win with.

amount_of_rounds 50


Maps

Type Map Enum Game Modes

Army Front

Al Kimar Pyramids AlKimarPyramids Army Assault, Army Battlefield, Army Deathmatch, Army Conquest

Army Front

Al Uddin Ruins AlUddinRuins Army Assault, Army Battlefield, Army Deathmatch, Army Conquest

Army Front

Arendan River ArendanRiver Army Assault, Army Battlefield, Army Deathmatch, Army Siege, Army Conquest

Army Front

Aspern Aspern Army Assault, Army Battlefield, Army Deathmatch, Army Conquest

Army Front

Aunby Valley AunbyValley Army Assault, Army Battlefield, Army Deathmatch, Army Conquest

Army Front

Autumn Watch AutumnWatch Army Assault, Army Battlefield, Army Deathmatch, Army Conquest

Army Front

Avignon Avignon Army Assault, Army Battlefield, Army Deathmatch, Army Conquest

Army Front

Black Forest BlackForest Army Assault, Army Battlefield, Army Deathmatch, Army Conquest

Army Front

Camp Salamanca CampSalamanca Army Assault, Army Battlefield, Army Deathmatch, Army Conquest

Army Front

Canyon Canyon Army Assault, Army Battlefield, Army Deathmatch, Army Conquest, Melee Arena

Army Front

Causeways Causeways Army Assault, Army Battlefield, Army Deathmatch, Army Conquest

Army Front

Cross Hills CrossHills Army Assault, Army Battlefield, Army Deathmatch, Army Conquest

Army Front

Desert Ruins DesertRuins Army Assault, Army Battlefield, Army Deathmatch, Army Conquest

Army Front

Dutch Canals DutchCanals Army Assault, Army Battlefield, Army Deathmatch, Army Conquest

Army Front

Ernest Ridge ErnestRidge Army Assault, Army Battlefield, Army Deathmatch, Army Conquest

Army Front

Fort Christina FortChristiana Army Assault, Army Battlefield, Army Deathmatch, Army Siege, Army Conquest

Army Front

Fort Darial FortDarial Army Siege

Army Front

Fort Pierre FortPierre Army Assault, Army Battlefield, Army Deathmatch, Army Siege, Army Conquest

Army Front

Fort Salettes FortSalettes Army Assault, Army Battlefield, Army Deathmatch, Army Siege, Army Conquest

Army Front

Fort Schwarz FortSchwarz Army Assault, Army Battlefield, Army Deathmatch, Army Siege, Army Conquest

Army Front

Fort Winston FortWinston Army Assault, Army Battlefield, Army Deathmatch, Army Siege, Army Conquest

Army Front

Glacier Glacier Army Assault, Army Battlefield, Army Deathmatch, Army Conquest, Army Siege

Army Front

Heartmound Heartmound Army Assault, Army Battlefield, Army Deathmatch, Army Conquest

Army Front

Highlands Highlands Army Assault, Army Battlefield, Army Deathmatch, Army Siege, Army Conquest

Army Front

Hudree Marsh HudreeMarsh Army Assault, Army Battlefield, Army Deathmatch, Army Conquest

Army Front

King George KingGeorge Army Assault, Army Battlefield, Army Deathmatch, Army Conquest

Army Front

LamarshFen Lamarsh Fen Army Assault, Army Battlefield, Army Deathmatch, Army Conquest

Army Front

Linburg Linburg Army Assault, Army Battlefield, Army Deathmatch, Army Conquest

Army Front

Marquette Marquette Army Assault, Army Battlefield, Army Deathmatch, Army Conquest

Army Front

Monte Pillerone Pass MontePilleronePass Army Assault, Army Battlefield, Army Deathmatch, Army Conquest

Army Front

Port Nile PortNile Army Assault, Army Battlefield, Army Deathmatch, Army Conquest

Army Front

Sacred Valley SacredValley Army Assault, Army Battlefield, Army Deathmatch, Army Conquest

Army Front

Sharpton Sharpton Army Assault, Army Battlefield, Army Deathmatch, Army Siege, Army Conquest

Army Front

Spanish Farm SpanishFarm Army Assault, Army Battlefield, Army Deathmatch, Army Conquest

Army Front

Vanoise Heights VanoiseHeights Army Assault, Army Battlefield, Army Deathmatch, Army Conquest

Frontlines WW1

Berkton Green BerktonGreen Offensive, Army Assault, Army Battlefield, Army Deathmatch, Army Conquest

Frontlines WW1

Countryside Countryside Offensive, Army Assault, Army Battlefield, Army Deathmatch, Army Conquest

Frontlines WW1

Fort Imraan FortImraan Army Siege, Invasion

Frontlines WW1

Foxhole Foxhole Offensive, Army Assault, Army Battlefield, Army Deathmatch, Army Conquest

Frontlines WW1

Freurlund Freurlund Offensive, Army Assault, Army Battlefield, Army Deathmatch, Army Conquest

Frontlines WW1

Heroes Landing HeroesLanding Offensive, Army Assault, Army Battlefield, Army Deathmatch, Army Conquest

Frontlines WW1

Mansion Mansion Offensive, Army Assault, Army Battlefield, Army Deathmatch, Army Conquest

Frontlines WW1

Marre Marre Offensive, Army Assault, Army Battlefield, Army Deathmatch, Army Conquest

Frontlines WW1

Sacrifice Sacrifice Offensive, Army Assault, Army Battlefield, Army Deathmatch, Army Conquest

Frontlines WW1

St. Peter's StPeters Offensive, Army Assault, Army Battlefield, Army Deathmatch, Army Conquest

Frontlines WW1

Wasteland Wasteland Offensive, Army Assault, Army Battlefield, Army Deathmatch, Army Conquest

Plains - Linebattle

Ancient Plains AncientPlains Army Assault, Army Battlefield, Army Deathmatch, Army Conquest

Plains - Linebattle

Desert Plains DesertPlains Army Assault, Army Battlefield, Army Deathmatch, Army Conquest

Plains - Linebattle

Desert Plains (Small) DesertPlainsSmall Army Assault, Army Battlefield, Army Deathmatch, Army Conquest

Plains - Linebattle

Grassy Plains 1 GrassyPlains Army Assault, Army Battlefield, Army Deathmatch, Army Conquest

Plains - Linebattle

Grassy Plains 2 GrassyPlainsII Army Assault, Army Battlefield, Army Deathmatch, Army Conquest

Plains - Linebattle

Grassy Plains 3 GrassyPlainsIII Army Assault, Army Battlefield, Army Deathmatch, Army Conquest

Plains - Linebattle

Grassy Plains 4 GrassyPlainsIV Army Assault, Army Battlefield, Army Deathmatch, Army Conquest

Plains - Linebattle

Grassy Plains 5 GrassyPlainsV Army Assault, Army Battlefield, Army Deathmatch, Army Conquest

Plains - Linebattle

Snowy Plains (Small) SnowyPlainsSmall Army Assault, Army Battlefield, Army Deathmatch, Army Conquest

Plains - Linebattle

Snowy Plains 1 SnowyPlains Army Assault, Army Battlefield, Army Deathmatch, Army Conquest

Plains - Linebattle

Snowy Plains 2 SnowyPlainsII Army Assault, Army Battlefield, Army Deathmatch, Army Conquest

Plains - Linebattle

Snowy Plains 3 SnowyPlainsIII Army Assault, Army Battlefield, Army Deathmatch, Army Conquest

Plains - Linebattle

Snowy Plains 4 SnowyPlainsIV Army Assault, Army Battlefield, Army Deathmatch, Army Conquest

Plains - Linebattle

Snowy Plains 5 SnowyPlainsV Army Assault, Army Battlefield, Army Deathmatch, Army Conquest

Plains - Linebattle

Tahir Desert Egypt Army Assault, Army Battlefield, Army Deathmatch, Army Conquest

Naval Warfront - Naval & Coastal

Balamor Bay BalamorBay Coastal Siege

Naval Warfront - Naval & Coastal

Caribbean Caribbean Naval Assault, Naval Battlefield

Naval Warfront - Naval & Coastal

Fort Imperial FortNational Coastal Siege

Naval Warfront - Naval & Coastal

Harouti Islands HaroutiIslands Naval Assault, Naval Battlefield

Naval Warfront - Naval & Coastal

Martello Tower MartelloTower Naval Assault, Naval Battlefield, Coastal Siege

Naval Warfront - Naval & Coastal

Open Waters RandomWaters Naval Assault, Naval Battlefield

Naval Warfront - Naval & Coastal

South Sea Castle SouthSeaCastle Army Assault, Army Battlefield, Army Deathmatch, Coastal Siege

Melee Arena

Castle Arena CastleArena Army Assault, Army Battlefield, Army Deathmatch, Army Conquest, Melee Arena

Melee Arena

Fort Arena FortArena Army Assault, Army Battlefield, Army Deathmatch, Army Conquest, Melee Arena

Melee Arena

Garrison Arena GarrisonArena Army Assault, Army Battlefield, Army Deathmatch, Army Conquest, Melee Arena

Melee Arena

Palisade Arena PalisadeArena Army Assault, Army Battlefield, Army Deathmatch, Army Conquest, Melee Arena

Melee Arena

Sacred Arena SacredArena Army Assault, Army Battlefield, Army Deathmatch, Army Conquest, Melee Arena

Melee Arena

Watchtower Arena WatchtowerArena Army Assault, Army Battlefield, Army Deathmatch, Army Conquest, Coastal Siege

Miscellaneous

Custom Map CustomMap Army Assault, Army Battlefield, Army Deathmatch, Army Siege, Army Conquest

Miscellaneous

Naval Custom Map CustomMapNaval Naval Assault, Naval Battlefield

Miscellaneous

Training Grounds TrainingGrounds Army Assault, Army Battlefield, Army Deathmatch, Army Conquest

Officer orders

Enable/disable the officers order system.

class_system_orders <true/false>

Enable/disable the officers reinforcement system. Flag in NaW, table in Frontlines.

class_system_orders_reinforce <true/false>

How long, in seconds, the officer can use the reinforcement ability.

class_system_orders_reinforce_cooldown 240

How many players will be able to spawn on a flag when it is placed down. Set this to -1 if playing on Frontlines gametype.

class_system_orders_reinforce_limit 25

Each of the leading abilities can have their cooldowns individually modified with these commands. All these commands take time in seconds

class_system_orders_reinforce_cooldown
class_system_orders_charge_cooldown
class_system_orders_formline_cooldown
class_system_orders_breakrankandfollow_cooldown
class_system_orders_fireatwill_cooldown
class_system_orders_makeready_cooldown
class_system_orders_fireorder_cooldown
class_system_orders_ceasefire_cooldown
class_system_orders_sergeantformline_cooldown
class_system_orders_sergeantrally_cooldown
class_system_orders_sergeantfireatwill_cooldown
class_system_orders_sergeantfireorder_cooldown
class_system_orders_sergeantceasefire_cooldown
class_system_orders_sergeantmakeready_cooldown
class_system_orders_sergeantbreakrankandfollow_cooldown

Conquest config

These config options also apply to the Frontlines gamemode "Offensive"

Conquest tick reward will grant the team a set amount of points per each tick. Recommended 3.

conquest_tick_reward 3

Conquest ticker time will set how long in seconds each tick for points will take. Recommended 1

conquest_ticker_time_seconds 1

How many points will be awarded to the team when you capture an objective. Recommended 100.

conquest_tickets_per_capture 100

How many points are required to win a game of conquest. ArmyConquest recommended 2500. Offensive recommended 7500.

conquest_max_tickets 7500

How long in seconds, till you can capture an objective after the round starts.

conquest_territory_lock_time_seconds 0

Weather and time of day

This setting will determine what weather and time of day preset will be active on map load. Setting this to none will result in a random pool of presets that are valid for that type of map.

nature_preset none

Friendly fire

Enable friendly fire?

friendly_fire <true/false>

If friendly fire is disabled, changing this to true will mean that when you hit a friendly player with a melee attack, the attack will act like it has hit a solid object, ending the melee attack. Setting this to false will result in melee attacks not interacting with friendly players and going directly though their hitbox uninterputed unless they interact with something else in the game world.

friendly_fire_melee_bounce <true/false>

Setting this to a number will be a percentage of how much friendly fire damage is reflected back to the player. For example setting this to 50, will mean that any damage you deal to a teammate, 50% of that damage will be reflected back to you.

damage_split 50

Frontlines

This will set how much time, in seconds, it takes for a team to become dominated, and lose the round in the Offensive gamemode on the Frontline gametype.

frontline_offensive_domination_duration_seconds 120

This will allow you to change settings of capture points in general.

capture_point_override <objective> <num_respawns> <time_for_1_person_to_capture> <max_people_affecting_time>

For example

capture_point_override A 150 30 1 //A capture point: 150 respawns with 30 sec capture, other people dont affect capture speed.
capture_point_override B 175 30 1 //B capture point: 175 respawns with 30 sec capture, other people dont affect capture speed.
capture_point_override C 350 60 2 //C capture point: 350 respawns with 60 sec capture alone, or 30 sec capture with 2+ people.
capture_point_override D -1 90 3 //A capture point: infinite respawns with 90 sec capture alone, 45 sec capture if 2, 30 sec capture if 3+

Automatic Console Commands

You can issue any of the Remote Console Commands at the start of a map rotation by included them in the server configuration file. You may want to do this to:

  • Reset default values for settings like God Mode or player movement speeds, either on a staging map like Training Grounds or on all possible maps.
  • Automatically spawn a number of bots on map load
  • Set up specific scenarios for non-standard events

Override Commands

Server administrators are able to create and customise their own roleplay scenarios through various server-side configuration settings. Override commands can be used to create a unique experience that is not limited by the usual confines of Holdfast: NaW's original gameplay design. Configure limits for classes, define the allowed spawnable classes per spawn point, select the equipment they spawn with, equip weapons from racks, replenish ammunition, spawn various props, interactable objects and artillery pieces per map rotation and more.

Here's how you can make use of override commands and any other related commands that can prove useful to help you get started or create your own scenarios.

Land

Class Limit Override On Spawn Points

Spawn override commands provide administrators with the ability to define which classes to spawn on which spawn location and their limitations as well. By using the following override, you can also have classes that are only playable on naval and coastal scenarios be present on army-based game modes.

Note: This will overwrite (not add to!) the classes available at a spawn point.

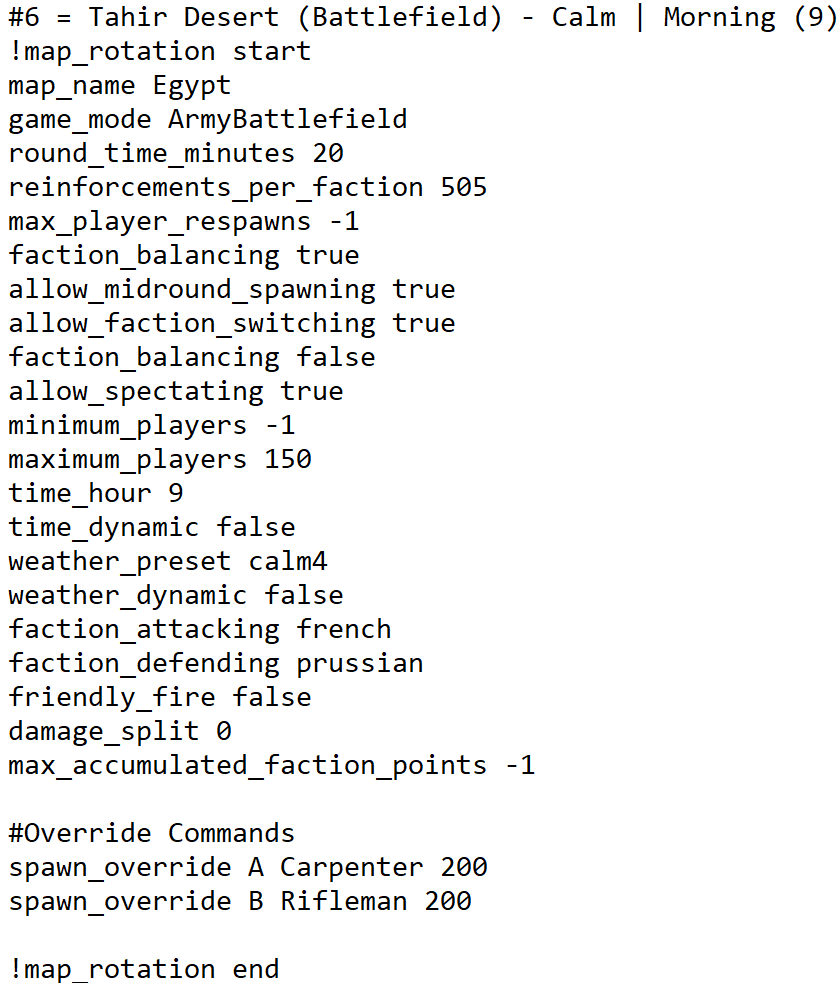
Tahir Desert Army Battlefield 200 Carpenters vs 200 Rifleman
spawn_override <Spawn Point> <Class> <Class Limit>
<Spawn Point> correlates to the spawn present in the spawn menu for instance Barricade (A) on Spanish Farm. Values are defined as letters for <Spawn Point> A B C D E F G H etc...
<Class> The name of the class being added to the spawn point
<Class Limit> An integer value between 1 and 255 - Set the number of players allowed to spawn as the specified class

Example

These commands will give 1 team 200 of the carpenter class and the other team 200 Riflemen:

# Override Commands (This is a comment and will be ignored by the game)
spawn_override A Carpenter 200
spawn_override B Rifleman 200

exclusive_modded_uniforms

Similarly, administrators have the ability to allow users to only spawn with modded uniforms.

Note: You will need a modded uniform for each class you want to spawn, as base game uniforms will not be available.

You can either set this command's value to "true" for it to apply to all factions, or else you can list only the factions you want to use modded uniforms for.

For example, to only apply mod exclusive uniforms for the British and French factions you can use:

exclusive_modded_uniforms british french

To use these commands, it must be added after !map_rotation start and before !map_rotation end.

Starting Weapon Override

Make use of the following override command to define the weapons each and every class for a particular faction spawn with. Due to the introduction of weapon racks that allow players to equip weapons irrespective of their class, a particular class can now spawn with multiple different firearm or melee weapon types.

To use this command for yourself it must be added after !map_rotation start and before !map_rotation end in the following format...

starting_weapons_selection_override <Faction> <Class> <Maximum Firearm Weapons> <Maximum Melee Weapons> <Weapon Class for Slot 1>* <Weapon Class for Slot 2>* <Weapon Class for Slot 3>*
<Faction> The Faction of the Class you wish to customize
<Class> The name of the class you wish to customize
<Maximum Firearm Weapons> An integer value between 0 and 50. The Maximum amount of Firearms that the class can possess through either the starting weapons commands or weapon racks.
<Maximum Melee Weapons> An integer value between 0 and 50. The Maximum amount of Melee Weapons that the class can possess through either the starting weapon commands or weapon racks.
Bayoneted Muskets count both as a firearm and a melee weapon
Allowing unarmed combat with fists also counts as a melee weapon
<Weapon Class for Slot> - The weapon(s) that the class will spawn with in each slot. These are optional, if none are passed, the player will spawn with just the fists.


For multiple weapon types per slot add a comma then another <Weapon Class>:

starting_weapons_selection_override <Faction> <Class> <Maximum Firearm Weapons> <Maximum Melee Weapons> <Weapon Class> <Weapon Class> <Weapon Class>,<Weapon Class>


Example Give the British grenadiers a rifle and Give the French grenadiers a rifle, pike or spontoon or sword and a pistol:

# Override Commands (This is a comment and will be ignored by the game)
starting_weapons_selection_override British Grenadier 4 2 Rifle
starting_weapons_selection_override French Grenadier 4 3 Rifle Pike,Spontoon,Sword Pistol

To use this command, it must be added after !map_rotation start and before !map_rotation end.


Starting Weapon Bayonet Override

Make use of the following command to override the default behaviour of whether a specific class can use bayonets or not. Since bayonetted and unbayonetted weapon class variants have now been merged into the same weapon class, you will need to use this to override bayonet state. By default, classes that have the Bayonet Handling ability have bayonets enabled.

starting_weapons_bayonet_enabled <Faction> <Class> <true/false>

Firearm Ammo Override

Use the following override command to configure firearm ammunition related settings as well as limitations. As the functionality for pickable weapons through weapon racks and ammo boxes exists within the game, through these settings we allow you to configure ammunition related settings for each and every weapon based on the class a firearm is being equipped by.

Input the below commands per map rotation in the server configuration file.

firearm_ammo_override <Faction> <Class> <Firearm> <Starting Ammo> <Loaded Ammo In Barrel> <Maximum Carryable Ammo>

<Faction> The Faction of the Class you wish to customize
<Class> The name of the class you wish to customize
<Firearm> The type of firearm that you are customizing
<Starting Ammo> An integer between 0 and 255 - The amount of ammunition the firearm will start with
<Loaded Ammo> An integer defined as a numerical value between 0 and 255 - How much ammunition is preloaded into the firearm for the weapons
Using values of 2 and above will act as temporary increase in clip size until the ammunition is drained and a reload is required.
<Maximum Carryable Ammo> An integer between 0 and 255 - The maximum amount of ammunition able to be carried for a firearm.
This value can be larger than <Starting Ammo> for game-modes that use the ammo box object

Example

Give the British light infantry two rounds but none in the barrel and give the French light infantry a musket with one loaded round but none in reserve:

# Override Commands (This is a comment and will be ignored by the game)
firearm_ammo_override British LightInfantry Musket_NewLandPatternBrownBess 2 0
firearm_ammo_override French LightInfantry Musket_NewLandPatternBrownBess 0 1

To use this command, it must be added after !map_rotation start and before !map_rotation end.


Weapon Class Ammo Override

To make things simpler and reduce clutter in the server config file, you can also override all weapons within a weapon class with the same values, instead of having to override every weapon individually. You can do that by using this command, which has identical parameters as the Firearm Ammo Override command, except it replaces the Firearm / Weapon Type parameter with a Weapon Class parameter.

weapon_class_ammo_override <Faction> <Class> <Weapon Class> <Starting Ammo> <Loaded Ammo In Barrel> <Maximum Carryable Ammo>

If you're using both commands, firearm overrides will always take priority over weapon class overrides.

Sapper Buildable Defences Limitations

Configure limitations per buildable object. With this, you can disable explosives, increase the buildable chair limit and more.

It is important to note this command functions similar to an RC command and it will persist through rounds. This means that if you disable explosives on the first map rotation, they will remain disabled on the map rotations following that unless otherwise enabled once more in a subsequent rotation.

Input the below commands per map rotation in the server configuration file.

sappers_buildlimit <Emplacement Type> <Attacking Or Defending> <Emplacement Limit>

<Emplacement Type> The emplacement you wish to set a limitation on
<Attacking Or Defending> If the limit should apply for the attacking or defending faction
<Emplacement Limit> An integer between 0 and 255 - Set a limit on the allowed buildable emplacements

Example

Disable the use of explosive barrels for the defending faction:

# Sapper Configuration Commands (This is a comment and will be ignored by the game)
sappers_buildlimit ExplosiveBarrel defending 0

To use this command, it must be added after !map_rotation start and before !map_rotation end.

Sapper Buildable Defences Starting Materials

Define the starting materials for the attacking and defending factions.

Input the below commands per map rotation in the server configuration file.

sappers_attacking_starting_materials <Material Limit>
sappers_defending_starting_materials <Material Limit>
<Material Limit> An integer between 0 and 10000 - Set the materials each faction starts with

Example

Set the starting limit for the attackers to 50 and the defenders to 200:

# Sapper Configuration Commands (This is a comment and will be ignored by the game)
sappers_attacking_starting_materials 50
sappers_defending_starting_materials 200

To use this command, it must be added after !map_rotation start and before !map_rotation end.

Spawn Overrides

Spawns can be overridden or added to, depending on the game type. For ArmyDeathmatch, ArmyBattlefield, and Melee Arena these commands will replace any existing spawn points on the map. For Siege and Conquest these will add to the existing set of spawn points. It is not currently possible to set up new capturable spawn points on maps. Using these in Naval or Coastal battles can result in players spawning in the middle of the ocean.

objects_override spawnsection <Position> <Rotation> <ID>,<Spawn_Point_Name>,<Spawn Category>,<Attacking, Defending or Neutral>,<Spawn Size X>,<Spawn Size Y>

<Position> A set of float values in the format x y z = 0.0 0.0 0.0 - The center of the spawn point on the map using x, y, and z coordinates.
Enter get playerPosition into the console ingame to display your character's position.
<Rotation> A set of float values in the format x y z = 0.0 0.0 0.0 - The rotation in degrees of the spawn point on the map around the x, y, and z axes, where Y is "up".
Enter get playerRotation into the console ingame to display your character's rotation.
<ID> A whole number uniquely identifying this spawn point. This must be between 10 and 256, and cannot match another ID.
<Spawn_Point_Name> The name you want listed in the spawn menu. Ideally these should be kept short to fit in the menu. To include spaces in the name, replace them with underscores. For example, the name Tahir_Desert_Ruins would display as Tahir Desert Ruins.
<Spawn Category> This defines the icon of the spawn in the menu. It should be selected from the following options:
BaseSpawn, FortifiedPosition, OpenPlains, Farm, Field, Village, Camp, Lodge, Church, Ruins, Port, Ship
<Attacking, Defending or Neutral> For Army Siege and Conquest, this will determine which faction can use this spawn. For other modes this is ignored, and the spawn points are granted half an half to each team based on their order of input in config.
<Spawn Size X> & <Spawn Size Y> This takes a floating point number and determines the size of the spawn area in meters. To visualise this when testing, spawn a couple of dozen bots with movement turned off.
Be careful not to have a large spawn area on the edge of the map as it can cause players to spawn out of bounds.

Naval

Class Limit Override On Ships

By using the following override commands, you can define your own selection of classes to spawn on which ship. It also provides you with the option of allowing players to spawn with army-based classes on ships. IE. If you're looking at allowing players to spawn with the Line Infantry Class on the 13-Gun Brig-Sloop, you can do just that.

Input the below commands per map rotation in the server configuration file.

ships_spawn_detail_override <Ship Type> <Faction> <Class> <Class Limit>

<Ship Type> Ship type of which to override the spawn point of
<Faction> The Faction of the ship
<Class> The name of the class being added to the spawn point
<Class Limit> An integer value between 1 and 255

Example

"Only" allow 200 Riflemen for British and French frigates.

# Override Commands (This is a comment and will be ignored by the game)
ships_spawn_detail_override Frigate50gun British Rifleman 200
ships_spawn_detail_override Frigate50gun French Rifleman 200

To use this command, it must be added after !map_rotation start and before !map_rotation end.

Ship Spawning & Custom Ship Presets

Make use of the commands below to define the ship types to spawn in a particular map rotation. Through the same command, you can also define the number of ships to spawn, for which faction as well as their paint scheme. It works on both the Naval Battlefield, Naval Assault & Coastal Siege game modes. You must make sure to set <ships_preset> index to 37 per map rotation before using the command below. This preset index doesn't contain any ships so you retain further control over the ships you want to spawn. IE. You can spawn in 1 50-Gun Frigate with a yellow and black color scheme for the British faction while having 3 8-Gun Schooners for the French with a random color variation

Input the below commands per map rotation in the server configuration file.

ships_spawn <Ship Type> <Amount Of Ships> <Faction> <Color> <Ship Name>

<Ship Type> Ship type to spawn
<Amount Of Ships> An integer between 0 and 50 - Amount of ships to spawn
<Faction> The Faction of the ship
<Color> Color is defined as an integer between 0 and 5

Example

Spawn 1 British frigate and 10 French rocketboats.

# Override Commands (This is a comment and will be ignored by the game)
# Set ship_preset to 37 (doesn't spawn any ships)
ships_preset 37
# Spawn ships
ships_spawn Frigate50gun 1 British 0
ships_spawn Rocketboat 10 French 4

To use this command, it must be added after !map_rotation start and before !map_rotation end.

Health Override For Ships

Administrators can define health points for each and every naval vessel type within the game. This addition could prove useful for organised events or perhaps even the creation of unique scenarios featuring flagships.

Input the below commands per map rotation in the server configuration file.

ships_health_detail_override <Ship Type> <Faction> <Health Points>

<Ship Type> Ship type to spawn
<Faction> The Faction of the ship
<Health Points> An integer value between 0 and 99999 - Health Points of the ship

Default Ship HP values:

Frigate: 5500
12GunBrigg: 3000
8GunSchooner: 2000
2GunSchooner: 1250
Gunboat: 500
Rocketboat: 500

Example

Set British frigate HP to 20000 and French frigate HP to 70 because Britannia rules the waves.

# Override Commands (This is a comment and will be ignored by the game)
ships_health_detail_override Frigate50gun British 20000
ships_health_detail_override Frigate50gun French 70

To use this command, it must be added after !map_rotation start and before !map_rotation end.

Ship Spacemode

Be at the forefront of interplanetary travel! By inserting this command per map rotation, you can enable ships to fly. Press the Space key to ascend and the Shift key to descend.

Input the below command per map rotation in the server configuration file.

ships_spacemode <True or False>

<True or False> True enables ships to fly while false is the default gameplay

Example

Enable ships to fly.

# Fun Commands (This is a comment and will be ignored by the game)
ships_spacemode true

Spawn Overrides

This operates in a similar fashion to the land spawn override, but to affect ship spawn locations on ocean maps. It will not override existing spawn locations, but will function on custom maps (such as CustomMapNaval) when using Naval Battlefield or Coastal Siege.

objects_override shipspawnsection <Position> <Rotation>

<Position> A set of float values in the format x y z = 0.0 0.0 0.0 - The center of the spawn point on the map using x, y, and z coordinates.
Enter get playerPosition into the console ingame to display your character's position.
<Rotation> A set of float values in the format x y z = 0.0 0.0 0.0 - The rotation in degrees of the spawn point on the map around the x, y, and z axes, where Y is "up".
Enter get playerRotation into the console ingame to display your character's rotation.

Object Override

Objects can be added to the game by following the guide in Map Editing.

Map Voting

Basics

To enable map voting in general, you need to setup a few commands in the global scope of your server config.

map_voting_enabled true
map_voting_duration 15
map_voting_allow_same_map false
map_voting_history_count 3
map_voting_gameplay_modes ArmyBattlefield ArmyBattlefield ArmyConquest ArmySiege
map_voting_log_file_path logs_output/mapvotinglogs.txt

map_voting_enabled

This tells the server that the map voting system is enabled or disabled.

map_voting_duration

This tells the system how long (in seconds) the map voting should allow people to vote for.

map_voting_allow_same_map

This tells the system if it should offer the same map. For example, in a naval oriented server, you might want to allow this to offer [RandomWaters|Maps] multiple times with different configs.

map_voting_history_count

This tells the system how long should a map not have been played for it to be allowed to be voted on again.

map_voting_gameplay_modes

This tells the system the order of which game modes should be playable. You're welcome to repeat any gamemode to pad out any different game mode.

map_voting_log_file_path

This will log the voted maps into a txt file of your choosing. (Not necessary to function)

Help my map can't be voted for

The way the map voting system works is in terms of buckets. These buckets are based on playable player counts and game mode. If you want a map to be completely ignored by map voting, set all the playable values to false. If you don't care about player count and want to enable the map for voting, set everything to true or leave the map rotation setting commented out.

population_verylow_playable  <true/false>
population_low_playable  <true/false>
population_medium_playable <true/false>
population_high_playable <true/false>

Another thing to note, the load order matters. If you're using a modded map, make sure that it's the first thing in the mod load order.

Map vote history depending on amount of players in server

map_voting_history_count_verylow 1
map_voting_history_count_low 2
map_voting_history_count_medium 4
map_voting_history_count_high 10

Can I manually trigger the map voting to start

Unfortunately, no, but theres a workaround. You can setup a win condition object or the dynamic win condition flag, and either of those systems would end the round and trigger map voting.

Including the option for random map voting

map_voting_include_random_choice <true/false>

Workshop Mods

For mod creators , more in-depth information can be found at Script Modding Guide.

Install mods

These commands must be entered as server-wide settings. They cannot be inside a map rotation.

mods_installed_server_only <steamid>
mods_installed <steamid>

These commands must be entered in a specific map rotation. Make sure that the mods steamID is installed on the server.

load_mod <steam_id> #loads the mod on client and server load_mod_client_only <steamid> #loads the mod on only clients machine load_mod_server_only <steamid> #loads the mod on only the servers machine

Mod Variables

Some workshop mods have settings that can be configured via the config.

mod_variable <string> #This will apply to all rotations. Should not be placed in a rotation.

mod_variable_local <string> #This will only apply to the rotation it is in. Must be placed inside a map rotation. 

Discord Admin Webhook Logger

Basics

To enable Discord webhooks you must have the Discord developer tools enabled. You can enable it in the "Advanced" tab in the Discord options.

Discord developer mode setting

Discord warnings will show things such as admin PMs, slays, kicks, revives and slaps. Discord banmutes will show things that write to config files, such as kicks, voip mutes, chat mutes and voip spammer.

discord_webhook_warning_tag_admin <@!ID> | <@!ID>
discord_webhook_warning_id <webhookID>
discord_webhook_warning_token <webhookToken>
discord_webhook_banmute_tag_admin <@!ID> | <@!ID>
discord_webhook_banmute_id <webhookID>
discord_webhook_banmute_token <webhookToken>

How to setup

These config commands should be input where the main server settings are, do not put them in map rotation.

To find the correct values, you must first make sure that you have the Discord permissions in your server to create webhooks. After this create one webhook for each set.

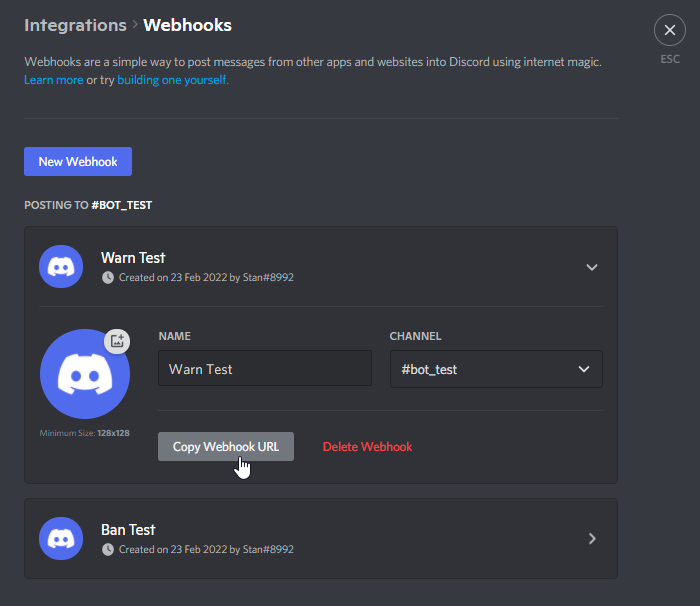
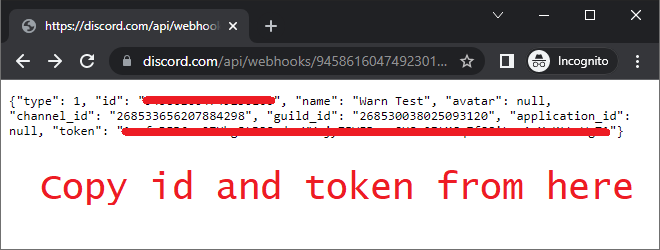
After you have made your two webhooks, you should see the option to "Copy Webhook URL". Open these in your browser and you will see assorted text. The details you need are "id:" and "token:". Copy the values from each of those into their respective _id and _token config commands.

_tag_admin will serve as a way to tag or input any text you would like at the top of the webhook url. To get the player you would like to attach to the discord message, right click on their name, at the bottom you should see "Copy ID". This will put that users ID into your clipboard. The format for the ping should be put as <@!12344567890>

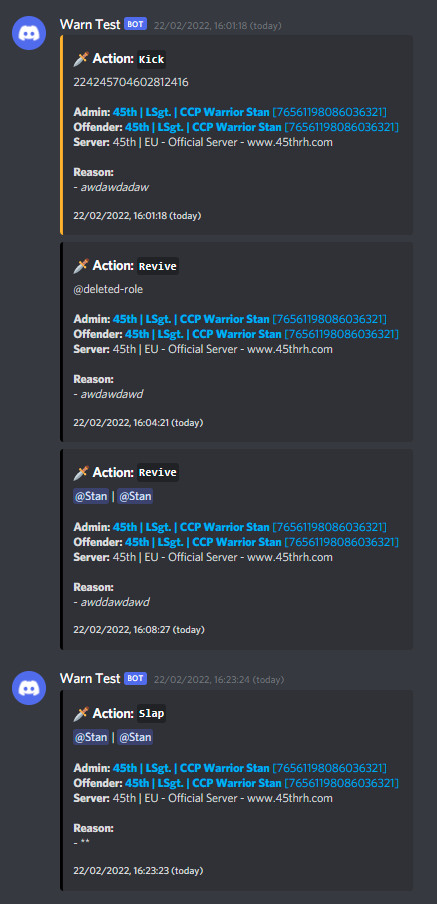
If done correctly, when you perform an admin action in game, the webhook will respond in the designated channel with the following information:

  • Action performed
  • Title provided in _tag_admin
  • Admin who performed the action (With a direct link to their Steam profile)
  • User who admin performed the action on (With a direct link to their Steam profile)
  • The name of the server the action was performed on
  • The reason
  • The date and time of the action
Where to create discord webhooks
Where to find the id and token
Discord admin webhook example