Difference between revisions of "Server Hosting"

From Holdfast: Nations At War
Jump to navigation Jump to search
(→‎Download using SteamCMD: Adds support information for A2S queries.)
 
(42 intermediate revisions by 5 users not shown)
Line 1: Line 1:
The following documentation details how to host a public or private gameserver for [[Holdfast: Nations At War]]. The game is currently in its Alpha stage and therefor doesn't have a dedicated server steamappID. The only officially supported game build is currently compiled for Windows x64, this means that hosting a server on Linux requires library-level virtualization (e.g. [https://www.winehq.org/ Wine]).
+
The following documentation details how to host a public or private game server for [[Holdfast: Nations At War]]. The game offers an anonymous dedicated server for both Linux and Windows.
  
'''To host a gameserver, you will require a Steam account that owns a copy of the game.'''
+
== Quick Start Guide ==
 +
Quick start guide for local testing:
 +
 
 +
# Download <code>Holdfast: Nations At War - Dedicated Server</code> from Steam (<code>Tools</code> Section)
 +
# Change the map rotation file (<code>serverconfig_default.txt</code>) and add mods or change maps.
 +
# Launch the server using the <code>LaunchServer.ps1</code> (Windows) or <code>LaunchServer.sh</code> (Linux) file
 +
 
 +
* In Holdfast's server browser click on "Join Custom Server", then click on the top "Connect" (leave localhost and change the port if required).
 +
* If you want other players to be able to connect, you likely have to setup port forwarding on your router and open the ports in your local firewall.
 +
'''Warning: Game updates will overwrite the changes to the <code>LaunchServer</code> script and <code>serverconfig_default.txt</code>. If you want to prevent this, create copies of both files and change the arguments of your custom <code>LaunchServer</code> script to point to your <code>serverconfig</code> file.'''
  
 
==Windows==
 
==Windows==
 
===Obtaining the game files===
 
===Obtaining the game files===
====Downloading using Steam Client====
+
====Download using Steam Client====
[[File:FolderStructure2.jpg|thumb|Holdfast game files folder structure]]
+
The easiest way to get access to server files would be to download though Steam, using the <code>Holdfast: Nations at War - Dedicated Server</code> app that will be in your Steam library.
  
Obtaining the game files can be done via the regular [https://store.steampowered.com/about/ Steam Client]. Download the game and copy the files to another folder. It's not recommended to use the SteamApps location as a base for the gameserver, as this might lead to file corruption if a game update overwrites files whilst the server is running.
+
To get started, navigate to your Steam library in the Steam Client.
  
This is the default directory where the [[Holdfast: Nations At War]] game files are located:
+
Select either Tools in the drop down list, or simply search <code>holdfast</code> into the search box (you might need to Tick "Tools" at the top of the list for the dedicated server to become visible), and you will be presented with three options.
<pre>
+
 
C:\Steam\steamapps\common\Holdfast Nations At War
+
Download the application named <code>Holdfast: Nations at War - Dedicated Server</code>
</pre>
+
 
Copy the files to the following location:
+
Once downloading is complete, right click on the list in Steam > Manage > Browse local files.
<pre>
+
{|style="margin: 0 auto;"
C:\holdfastserver
+
| [[File:ServerSteamLocation.png|thumb|Steam Application you need to download]]
</pre>
+
| [[File:ServerBrowseLocalFiles.png|thumb|Browse local files on Steam client]]
 +
|}
  
====Downloading using SteamCMD====
+
====Download using SteamCMD====
 
The '''Steam Console Client''' or [https://developer.valvesoftware.com/wiki/SteamCMD '''SteamCMD'''] is a command-line version of the Steam client. Its primary use is to install and update various dedicated servers available on Steam using a command-line interface. It works with games that use the SteamPipe content system. All games have been migrated from the deprecated HLDSUpdateTool to [https://developer.valvesoftware.com/wiki/SteamCMD '''SteamCMD''']. This is usually required if you are forced to use a terminal for your server setup. You can find instructions on how to download [https://developer.valvesoftware.com/wiki/SteamCMD '''SteamCMD'''] here: https://developer.valvesoftware.com/wiki/SteamCMD#Windows
 
The '''Steam Console Client''' or [https://developer.valvesoftware.com/wiki/SteamCMD '''SteamCMD'''] is a command-line version of the Steam client. Its primary use is to install and update various dedicated servers available on Steam using a command-line interface. It works with games that use the SteamPipe content system. All games have been migrated from the deprecated HLDSUpdateTool to [https://developer.valvesoftware.com/wiki/SteamCMD '''SteamCMD''']. This is usually required if you are forced to use a terminal for your server setup. You can find instructions on how to download [https://developer.valvesoftware.com/wiki/SteamCMD '''SteamCMD'''] here: https://developer.valvesoftware.com/wiki/SteamCMD#Windows
  
Line 31: Line 41:
 
: You might need to enter a ''2-Factor Auth Code'' during this step.
 
: You might need to enter a ''2-Factor Auth Code'' during this step.
 
: In case the server ever  stops working you can run the command with ''+app_update 589290 validate'' to verify the game files.
 
: In case the server ever  stops working you can run the command with ''+app_update 589290 validate'' to verify the game files.
 
===Obtaining the server files===
 
 
Download the server files from the link below and extract them over to the ‘C:\holdfastserver’ folder on your server box.
 
 
[https://www.dropbox.com/sh/ppkfny3r9kcnz8x/AADiIXOrlAWPh-XbhPpimw0ja?dl=0 From Dropbox]
 
 
You can also download the folder from Baidu. This is especially useful for server hosts located in China were access to Dropbox might be blocked.This might not always be up to date with the latest version.
 
 
[https://pan.baidu.com/s/1qYqNnty From Baidu]
 
 
'''''Note:''' These files change from time to time but not necessarily every update, only reapply them if the server stops working after an update.''


===Basic Configuration & Starting the Server===
 
===Basic Configuration & Starting the Server===
 
[[File:FolderStructure.jpg|thumb|Holdfast merged server & game files folder structure]]
 
[[File:FolderStructure.jpg|thumb|Holdfast merged server & game files folder structure]]
  
The server files come with a selection of example serverconfigs that show off how to setup various maps and gamemodes. Consult the [[Server_Configuration|Server Configuration]] page to find out more about modifying the server config.
+
The server files come with a selection of example server configs that show off how to setup various maps and game modes. Consult the [[Server_Configuration|Server Configuration]] page to find out more about modifying the server config.
  
Duplicate one of the example configs, for example:
+
Duplicate the example config <code>serverconfig_server_default.txt</code> and the launch script <code>LaunchServer.ps1</code>
  
 
<pre>
 
<pre>
serverconfig_server1_armybattlefield.txt -> serverconfig_server1_newserver.txt
+
serverconfig_default.txt -> serverconfig_newserver.txt
 +
LaunchServer.ps1 -> LaunchServer_newserver.ps1
 
</pre>
 
</pre>
  
Line 58: Line 57:
  
 
<pre>
 
<pre>
### Server & Steam Ports (All 3 ports must be unique per server instance).
+
### Server & Steam Ports (Both ports must be unique per server instance).
 
server_port 20100
 
server_port 20100
steam_communications_port 8700
 
 
steam_query_port 27000
 
steam_query_port 27000
 
</pre>
 
</pre>
  
Notes:
+
'''Notes:'''
:Make sure to open the appropriate firewall ports both for TCP and UDP!
+
:Make sure to open the appropriate firewall ports for UDP!
:[[Holdfast: Nations At War|Holdfast]] gameservers respond, when correctly configured, to [https://developer.valvesoftware.com/wiki/Server_queries A2S Queries] on the ''steam_query_port''. Returning map, player count and player information when requested.
+
:Holdfast game servers respond, when correctly configured, to [https://developer.valvesoftware.com/wiki/Server_queries A2S Queries] on the ''steam_query_port''. Returning map, player count and player information when requested.
 +
:Official Holdfast game servers are not configured to respond to A2S Queries. This feature is only supported by community game servers.
  
 
Basic trivial variables:
 
Basic trivial variables:
 
<pre>
 
<pre>
server_name New Server - Army Battlefield
+
server_name My Server
server_welcome_message Welcome to my new game server!
+
server_region europe #
server_region europe
+
server_admin_password defaultAdminPWReplace
server_admin_password ChangeThisPassword
+
#server_password mypassword
#server_password ChangeThisPassword
 
 
</pre>
 
</pre>
  
Networking setup (loosely "low / high tick" settings):
+
Edit the <code>LaunchServer_newserver.ps1</code> to use your newly created config:
 
<pre>
 
<pre>
# LowLatency = Reduced packet rate on close-range (high player count)
+
$args = '-s -r --serverConfigFilePath "serverconfig_newserver.txt" --outputLog "logs_output\outputlog_newserver.txt" --logArchivesDirectory "logs_archive" --framerate 120 --serverheadless --adminCommandLogFilePath "logs_adminactions\adminlog_newserver.txt" --chatLogFilePath "logs_chat\chatlog_newserver.txt" --playersLogFilePath "logs_playerlogin\playerlogin_newserver.txt" --scoreboardLogFilePath "logs_score\scorelog_newserver.txt"'
# HighAccuracy = Increased packet rate on close-range (low player count)
+
 
network_broadcast_mode LowLatency
+
Start-Process -FilePath "vapuriloadtester.exe" -Verb RunAs -ArgumentList $args
 
</pre>
 
</pre>
 +
 +
You can now launch gameserver by starting the <code>LaunchServer_newserver.ps1</code>.
  
 
==Linux==
 
==Linux==
As there is no dedicated server and no Linux build, setting up a [[Holdfast: Nations At War]] game server requires the usage of [https://www.winehq.org/ Wine] or some other sort of library-level virtualization. This will always incur [https://www.phoronix.com/scan.php?page=article&item=wine_win7_2010&num=2 performance looses], so it's not recommended to use [https://www.winehq.org/ Wine] to host large player servers (> 60 players). One can observe such behaviour if players start continuously sliding and jittering on the server, this can't be observed on non-virtualized game servers
+
===Docker===
===Download Requirements===
+
If your server is running [https://www.docker.com/ Docker], you can simply use:
====Ubuntu & Debian====
 
Make sure no previous version of [https://www.winehq.org/ Wine] has been installed, if it has, uninstall it completely and don't forget to run apt-get autoremove to clean up the remaining files. This command will install all required packages and [https://www.winehq.org/ Wine] for you:
 
 
<pre>
 
<pre>
$ dpkg --add-architecture i386 \
+
docker run -d --net=host --name=holdfastnaw-dedicated cm2network/holdfastnaw
        && apt-get update \
 
        && apt-get install -y \
 
            gnupg \
 
            gnupg1 \
 
            gnupg2 \
 
            curl \
 
            unzip \
 
            xvfb \
 
        && curl -o Release.key https://dl.winehq.org/wine-builds/Release.key \
 
        && apt-key add Release.key \
 
        && echo "deb http://dl.winehq.org/wine-builds/debian stretch main" >> /etc/apt/sources.list \
 
        && apt-get update \
 
        && apt-get install -y --install-recommends winehq-stable \
 
        && rm Release.key \
 
        && curl http://dl.winehq.org/wine/wine-mono/4.7.1/wine-mono-4.7.1.msi | wine msiexec /i; exit 0
 
 
</pre>
 
</pre>
  
If you want to perform a cleanup run the following command:
+
The container will automatically update the game on startup, so if there is a game update just restart the container.
 +
 
 +
The config is located here: ''/home/steam/holdfastnaw-dedicated/''
 +
 
 +
If you want to launch another instance you can increment the environment variables, using -e (--env):
 
<pre>
 
<pre>
$ apt-get clean autoclean \
+
docker run -d --net=host -e SERVER_PORT=20100 -e STEAM_QUERY_PORT=27000 --name=holdfastnaw-dedicated cm2network/holdfastnaw
        && apt-get autoremove -y \
 
        && rm -rf /var/lib/{apt,dpkg,cache,log}/
 
 
</pre>
 
</pre>
 +
 +
You can find the associated Docker Hub page here:
 +
[https://hub.docker.com/r/cm2network/holdfastnaw/ https://hub.docker.com/r/cm2network/holdfastnaw/]
 +
 +
===Manual Setup===
  
 
===Obtaining the game files===
 
===Obtaining the game files===
Line 119: Line 109:
 
The '''Steam Console Client''' or [https://developer.valvesoftware.com/wiki/SteamCMD '''SteamCMD'''] is a command-line version of the Steam client. Its primary use is to install and update various dedicated servers available on Steam using a command-line interface. It works with games that use the SteamPipe content system. All games have been migrated from the deprecated HLDSUpdateTool to [https://developer.valvesoftware.com/wiki/SteamCMD '''SteamCMD''']. This is usually required if you are forced to use a terminal for your server setup. You can find instructions on how to download [https://developer.valvesoftware.com/wiki/SteamCMD '''SteamCMD'''] here: https://developer.valvesoftware.com/wiki/SteamCMD#Linux
 
The '''Steam Console Client''' or [https://developer.valvesoftware.com/wiki/SteamCMD '''SteamCMD'''] is a command-line version of the Steam client. Its primary use is to install and update various dedicated servers available on Steam using a command-line interface. It works with games that use the SteamPipe content system. All games have been migrated from the deprecated HLDSUpdateTool to [https://developer.valvesoftware.com/wiki/SteamCMD '''SteamCMD''']. This is usually required if you are forced to use a terminal for your server setup. You can find instructions on how to download [https://developer.valvesoftware.com/wiki/SteamCMD '''SteamCMD'''] here: https://developer.valvesoftware.com/wiki/SteamCMD#Linux
  
The files can then be obtain using the following bash command:
+
The dedicated server can then be obtain using the following bash command:
 
<pre>
 
<pre>
 
$ steamcmd.sh \
 
$ steamcmd.sh \
        +@sSteamCmdForcePlatformType windows \
+
         +login anonymous \
         +login [LOGINNAME] [PASSWORD] \
 
 
         +force_install_dir /opt/holdfastserver \
 
         +force_install_dir /opt/holdfastserver \
         +app_update 589290 +quit
+
         +app_update 1424230 +quit
 
</pre>
 
</pre>
  
 
Notes:
 
Notes:
: This will download the Windows game files. Library-level virtualization is required to run them (e.g. [https://www.winehq.org/ Wine]).
+
: In case the server ever stops working you can run the command with ''+app_update 1424230 validate'' to verify the game files.
: ''+anonymous'' will fail because the account requires to own a copy of the game to download the game files!
 
: You might need to enter a ''2-Factor Auth Code'' during this step.
 
: In case the server ever stops working you can run the command with ''+app_update 589290 validate'' to verify the game files.


===Obtaining the server files===
 
You can obtain the server files, hosted [https://www.dropbox.com/sh/ppkfny3r9kcnz8x/AADiIXOrlAWPh-XbhPpimw0ja?dl=1 here], using the following command:
 
<pre>
 
$ cd /opt/holdfastserver \
 
        && curl -L -o holdfast_naw_public_servers.zip https://www.dropbox.com/sh/ppkfny3r9kcnz8x/AADiIXOrlAWPh-XbhPpimw0ja?dl=1 \
 
        && unzip -o holdfast_naw_public_servers.zip \
 
        && rm holdfast_naw_public_servers.zip
 
</pre>
 
This will place the server files in the install directory of the [[Holdfast: Nations At War|Holdfast]] game files.<br>
 
'''''Note:''' These files change from time to time but not necessarily every update, only reapply them if the server stops working after an update.''


===Basic Configuration & Starting the Server===
 
===Basic Configuration & Starting the Server===
The server files come with a selection of example serverconfigs that show off how to setup various maps and gamemodes. Consult the [[Server_Configuration|Server Configuration]] page to find out more about modifying the server config.
+
The dedicated server comes with an example server config that shows off how to setup a basic game server. Consult the [[Server_Configuration|Server Configuration]] page to find out more about modifying server configs.
  
Duplicate one of the example configs using the following command:
+
Duplicate the example config using the following command:
  
 
<pre>
 
<pre>
$ cp serverconfig_server1_armybattlefield.txt serverconfig_server1_newserver.txt
+
$ cd /opt/holdfastserver
 +
$ cp serverconfig_default.txt serverconfig_myserver.txt
 
</pre>
 
</pre>
  
This will make sure that if you ever have to reapply the server files, the server config will not be overwritten. Open the new config file using your favorite ''vim, nano'' or ''emacs'' and configure the basic server settings:
+
'''It's strongly advised to duplicate the "serverconfig_default.txt" as a game update or validate might overwrite the file'''.  
 +
 
 +
Open the new config file using your favorite ''vim, nano'' or ''emacs'' and configure the basic server settings:
  
 
<pre>
 
<pre>
### Server & Steam Ports (All 3 ports must be unique per server instance).
+
### Server & Steam Ports (Both ports must be unique per server instance).
 
server_port 20100
 
server_port 20100
steam_communications_port 8700
 
 
steam_query_port 27000
 
steam_query_port 27000
 
</pre>
 
</pre>
  
 
Notes:
 
Notes:
:Make sure to open the appropriate firewall ports both for TCP and UDP!
+
:Make sure to open the appropriate firewall ports for UDP!
:[[Holdfast: Nations At War|Holdfast]] gameservers respond, when correctly configured, to [https://developer.valvesoftware.com/wiki/Server_queries A2S Queries] on the ''steam_query_port''. Returning map, player count and player information when requested.
+
:Holdfast gameservers respond, when correctly configured, to [https://developer.valvesoftware.com/wiki/Server_queries A2S Queries] on the ''steam_query_port''. Returning map, player count and player information when requested.
  
 
Basic trivial variables:
 
Basic trivial variables:
 
<pre>
 
<pre>
server_name New Server - Army Battlefield
+
server_name My Server
server_welcome_message Welcome to my new game server!
+
server_region europe #
server_region europe
+
server_admin_password defaultAdminPWReplace
server_admin_password ChangeThisPassword
+
#server_password mypassword
#server_password ChangeThisPassword
 
 
</pre>
 
</pre>
  
Networking setup (loosely "low / high tick" settings):
+
You can then start the server using the following commands:<pre>
<pre>
+
# Start holdfast server
# LowLatency = Reduced packet rate on close-range (high player count)
+
"./Holdfast NaW" -startserver \
# HighAccuracy = Increased packet rate on close-range (low player count)
+
-batchmode \
network_broadcast_mode LowLatency
+
-nographics \
 +
-screen-width 640 \
 +
-screen-height 480 \
 +
-screen-quality "Fastest" \
 +
-framerate "120" \
 +
--serverheadless \
 +
-serverConfigFilePath "serverconfig_myserver.txt" \
 +
-logFile "logs_output/outputlog_server.txt" \
 +
-logArchivesDirectory "logs_archive/" \
 +
-p "20100"
 
</pre>
 
</pre>
 
You can then start the server using the following commands:
 
 
<pre>
 
# Remove old screens
 
rm /tmp/.X0-lock 2> /dev/null
 
 
# Create new screen
 
Xvfb :0 -screen 0 1024x768x16 &
 
 
# Start holdfast server on new display
 
DISPLAY=:0.0 WINEDEBUG=-all wine "Holdfast NaW.exe" \
 
        -startserver \
 
        -batchmode \
 
        -screen-width 640 \
 
        -screen-height 480 \
 
        -screen-quality Fastest \
 
        -framerate 60 \
 
        --serverheadless \
 
        --servercarbonplayers 0 \
 
        -serverConfigFilePath serverconfig_server1_newserver.txt \
 
        -logFile logs_output/outputlog_server.txt \
 
        -logArchivesDirectory logs_archive \
 
        -s [INSERTSERVERIP] \
 
        -p 20100 \
 
        -l "94.130.66.231" \
 
        -o 7101
 
</pre>
 
 
Note:
 
:"94.130.66.231" - is the holdfast lobby server IP (masterserver).
 

Latest revision as of 11:30, 30 September 2024

The following documentation details how to host a public or private game server for Holdfast: Nations At War. The game offers an anonymous dedicated server for both Linux and Windows.

Quick Start Guide

Quick start guide for local testing:

  1. Download Holdfast: Nations At War - Dedicated Server from Steam (Tools Section)
  2. Change the map rotation file (serverconfig_default.txt) and add mods or change maps.
  3. Launch the server using the LaunchServer.ps1 (Windows) or LaunchServer.sh (Linux) file
  • In Holdfast's server browser click on "Join Custom Server", then click on the top "Connect" (leave localhost and change the port if required).
  • If you want other players to be able to connect, you likely have to setup port forwarding on your router and open the ports in your local firewall.

Warning: Game updates will overwrite the changes to the LaunchServer script and serverconfig_default.txt. If you want to prevent this, create copies of both files and change the arguments of your custom LaunchServer script to point to your serverconfig file.

Windows

Obtaining the game files

Download using Steam Client

The easiest way to get access to server files would be to download though Steam, using the Holdfast: Nations at War - Dedicated Server app that will be in your Steam library.

To get started, navigate to your Steam library in the Steam Client.

Select either Tools in the drop down list, or simply search holdfast into the search box (you might need to Tick "Tools" at the top of the list for the dedicated server to become visible), and you will be presented with three options.

Download the application named Holdfast: Nations at War - Dedicated Server

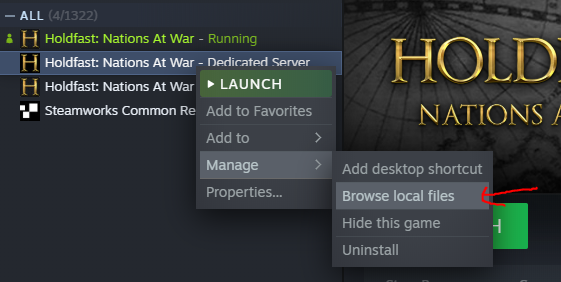
Once downloading is complete, right click on the list in Steam > Manage > Browse local files.

Steam Application you need to download
Browse local files on Steam client

Download using SteamCMD

The Steam Console Client or SteamCMD is a command-line version of the Steam client. Its primary use is to install and update various dedicated servers available on Steam using a command-line interface. It works with games that use the SteamPipe content system. All games have been migrated from the deprecated HLDSUpdateTool to SteamCMD. This is usually required if you are forced to use a terminal for your server setup. You can find instructions on how to download SteamCMD here: https://developer.valvesoftware.com/wiki/SteamCMD#Windows

The files can then be obtain using the following batch command:

$ steamcmd +login [LOGINNAME] [PASSWORD] +force_install_dir "C:\holdfastserver" +app_update 589290 +quit

Notes:

+anonymous will fail because the account requires to own a copy of the game to download the game files!
You might need to enter a 2-Factor Auth Code during this step.
In case the server ever stops working you can run the command with +app_update 589290 validate to verify the game files.

Basic Configuration & Starting the Server

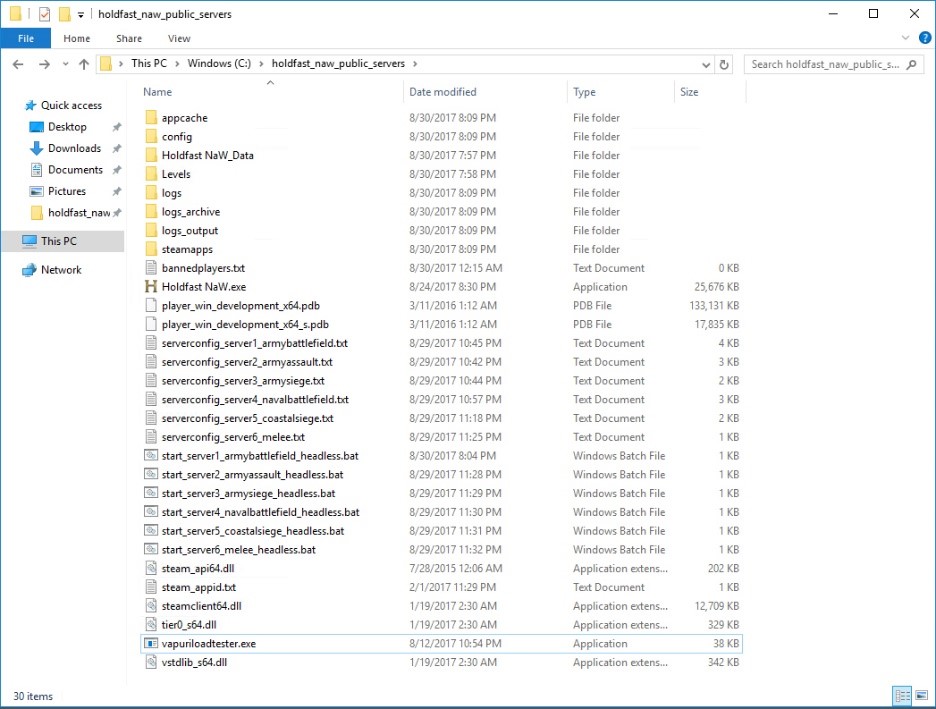
Holdfast merged server & game files folder structure

The server files come with a selection of example server configs that show off how to setup various maps and game modes. Consult the Server Configuration page to find out more about modifying the server config.

Duplicate the example config serverconfig_server_default.txt and the launch script LaunchServer.ps1

serverconfig_default.txt -> serverconfig_newserver.txt
LaunchServer.ps1 -> LaunchServer_newserver.ps1

This will make sure that if you ever have to reapply the server files, the server config will not be overwritten. Open the new config file using your favorite Notepad or Notepad++ and configure the basic server settings:

### Server & Steam Ports (Both ports must be unique per server instance).
server_port 20100
steam_query_port 27000

Notes:

Make sure to open the appropriate firewall ports for UDP!
Holdfast game servers respond, when correctly configured, to A2S Queries on the steam_query_port. Returning map, player count and player information when requested.
Official Holdfast game servers are not configured to respond to A2S Queries. This feature is only supported by community game servers.

Basic trivial variables:

server_name My Server
server_region europe #
server_admin_password defaultAdminPWReplace
#server_password mypassword

Edit the LaunchServer_newserver.ps1 to use your newly created config:

$args = '-s -r --serverConfigFilePath "serverconfig_newserver.txt" --outputLog "logs_output\outputlog_newserver.txt" --logArchivesDirectory "logs_archive" --framerate 120 --serverheadless --adminCommandLogFilePath "logs_adminactions\adminlog_newserver.txt" --chatLogFilePath "logs_chat\chatlog_newserver.txt" --playersLogFilePath "logs_playerlogin\playerlogin_newserver.txt" --scoreboardLogFilePath "logs_score\scorelog_newserver.txt"'

Start-Process -FilePath "vapuriloadtester.exe" -Verb RunAs -ArgumentList $args

You can now launch gameserver by starting the LaunchServer_newserver.ps1.

Linux

Docker

If your server is running Docker, you can simply use:

docker run -d --net=host --name=holdfastnaw-dedicated cm2network/holdfastnaw

The container will automatically update the game on startup, so if there is a game update just restart the container.

The config is located here: /home/steam/holdfastnaw-dedicated/

If you want to launch another instance you can increment the environment variables, using -e (--env):

docker run -d --net=host -e SERVER_PORT=20100 -e STEAM_QUERY_PORT=27000 --name=holdfastnaw-dedicated cm2network/holdfastnaw

You can find the associated Docker Hub page here: https://hub.docker.com/r/cm2network/holdfastnaw/

Manual Setup

Obtaining the game files

Downloading using SteamCMD

The Steam Console Client or SteamCMD is a command-line version of the Steam client. Its primary use is to install and update various dedicated servers available on Steam using a command-line interface. It works with games that use the SteamPipe content system. All games have been migrated from the deprecated HLDSUpdateTool to SteamCMD. This is usually required if you are forced to use a terminal for your server setup. You can find instructions on how to download SteamCMD here: https://developer.valvesoftware.com/wiki/SteamCMD#Linux

The dedicated server can then be obtain using the following bash command:

$ steamcmd.sh \
        +login anonymous \
        +force_install_dir /opt/holdfastserver \
        +app_update 1424230 +quit

Notes:

In case the server ever stops working you can run the command with +app_update 1424230 validate to verify the game files.

Basic Configuration & Starting the Server

The dedicated server comes with an example server config that shows off how to setup a basic game server. Consult the Server Configuration page to find out more about modifying server configs.

Duplicate the example config using the following command:

$ cd /opt/holdfastserver
$ cp serverconfig_default.txt serverconfig_myserver.txt

It's strongly advised to duplicate the "serverconfig_default.txt" as a game update or validate might overwrite the file.

Open the new config file using your favorite vim, nano or emacs and configure the basic server settings:

### Server & Steam Ports (Both ports must be unique per server instance).
server_port 20100
steam_query_port 27000

Notes:

Make sure to open the appropriate firewall ports for UDP!
Holdfast gameservers respond, when correctly configured, to A2S Queries on the steam_query_port. Returning map, player count and player information when requested.

Basic trivial variables:

server_name My Server
server_region europe #
server_admin_password defaultAdminPWReplace
#server_password mypassword

You can then start the server using the following commands:

# Start holdfast server
"./Holdfast NaW" -startserver \
		-batchmode \
		-nographics \
		-screen-width 640 \
		-screen-height 480 \
		-screen-quality "Fastest" \
		-framerate "120" \
		--serverheadless \
		-serverConfigFilePath "serverconfig_myserver.txt" \
		-logFile "logs_output/outputlog_server.txt" \
		-logArchivesDirectory "logs_archive/" \
		-p "20100"