Difference between revisions of "Script Modding Guide"

From Holdfast: Nations At War
Jump to navigation Jump to search
 
(83 intermediate revisions by 4 users not shown)
Line 1: Line 1:
= How to create a script SDK mod =
+
= Getting Started =
 +
'''''Basic knowledge of C# and Unity is required.'''''
  
====Basic knowledge of C# and Unity is required.====
+
== Setting Up Your Environment ==
  
To start with script modding in holdfast, create a new mod and in this mod’s folder create a new script. This script should implement the shared interface [[Script_Modding_Guide#IHoldfastSharedMethods|IHoldfastSharedMethods]].  
+
=== Connecting Unity to your editor ===
 +
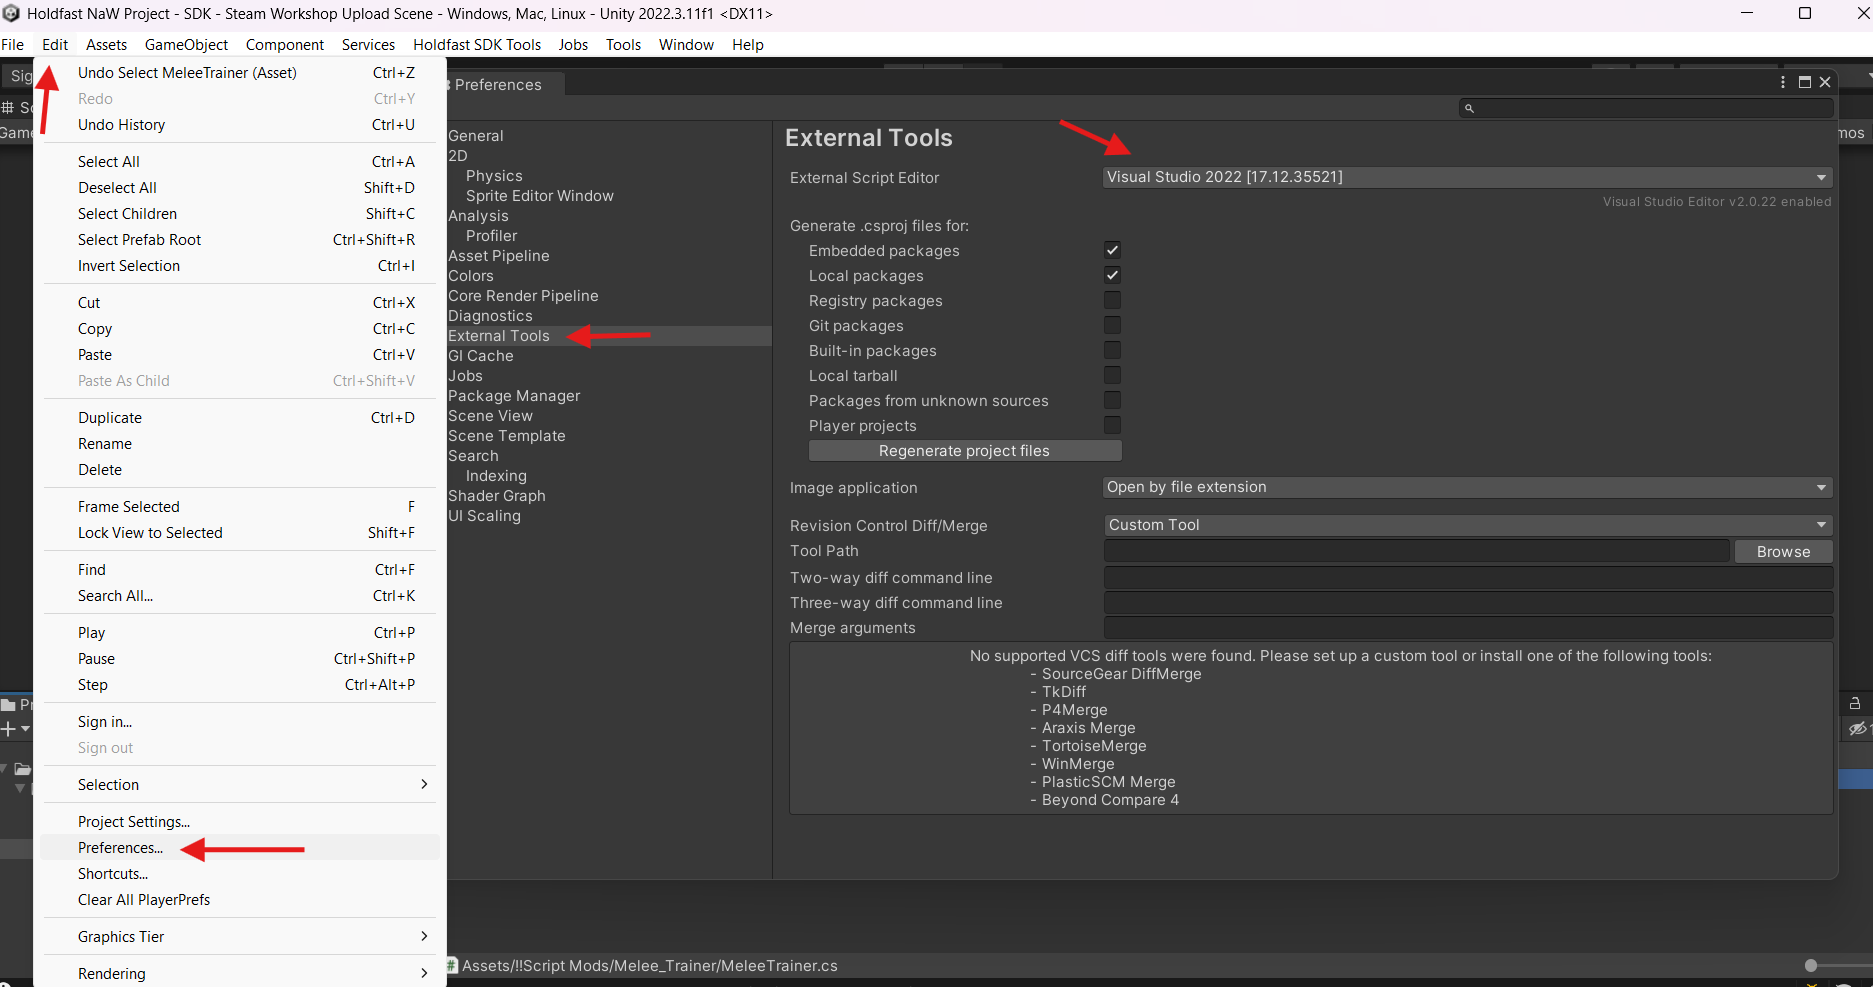
Make sure your Unity Editor is connected to whatever you're using to write the script. (Example: Visual Studio Community)
  
For example, here’s a mod that’s called “LineFormer” that has the script called “LineFormer.cs” which implements the IHoldfastSharedMethods interface.
+
In the Unity Editor, click Edit -> Preferences -> External Tools -> External Script Editor -> Visual Studio Community.
 +
[[File:HoldfastEditorConnection.png|center|thumb|700x700px|alt=]]
  
[[File:Script Modding Create Project.png|center]]
+
''Restart both your Unity Editor and your Script Editor to make sure these changes take affect.''
  
= New RC commands specific for modding use =
+
=== Creating your mod ===
 +
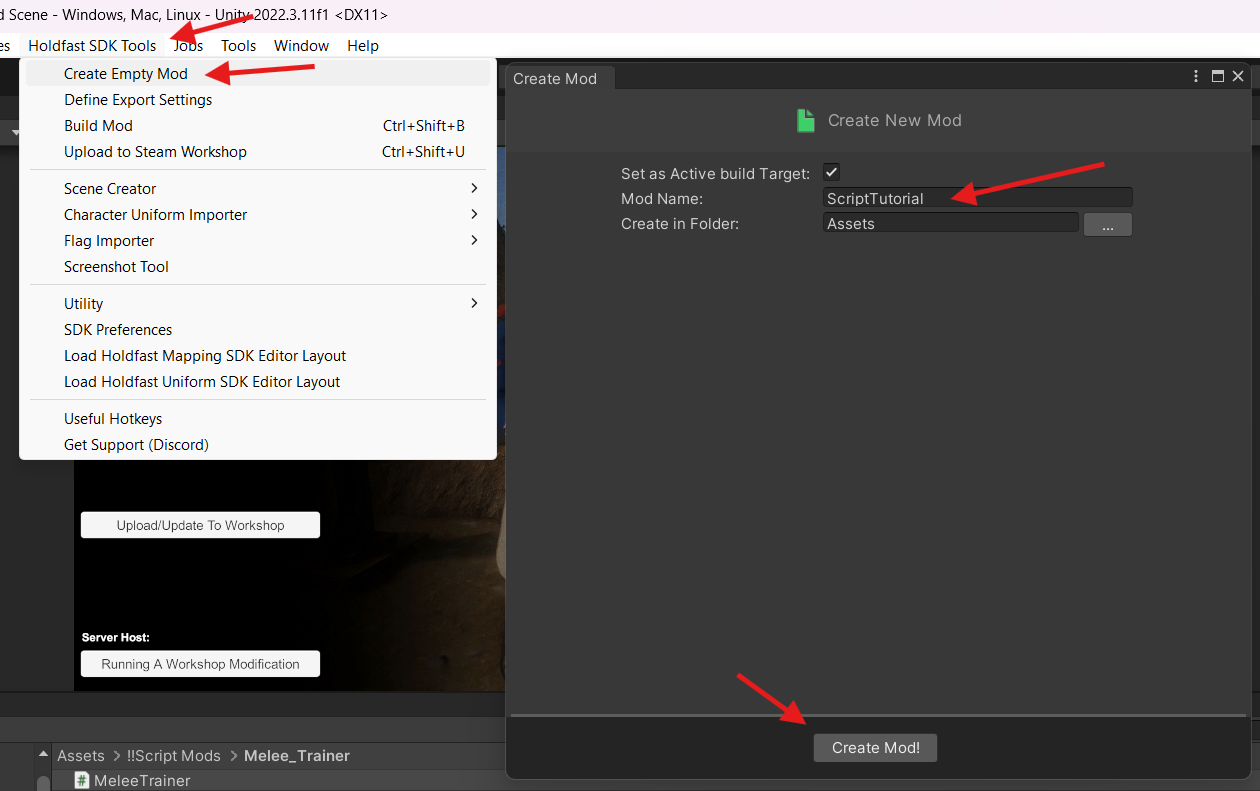
Create a new mod and name it whatever your script does.
 +
 
 +
In the Unity Editor click Holdfast SDK Tools -> Create Empty Mod
 +
[[File:Image 2024-12-03 104649232.png|center|thumb|700x700px]] 
 +
 
 +
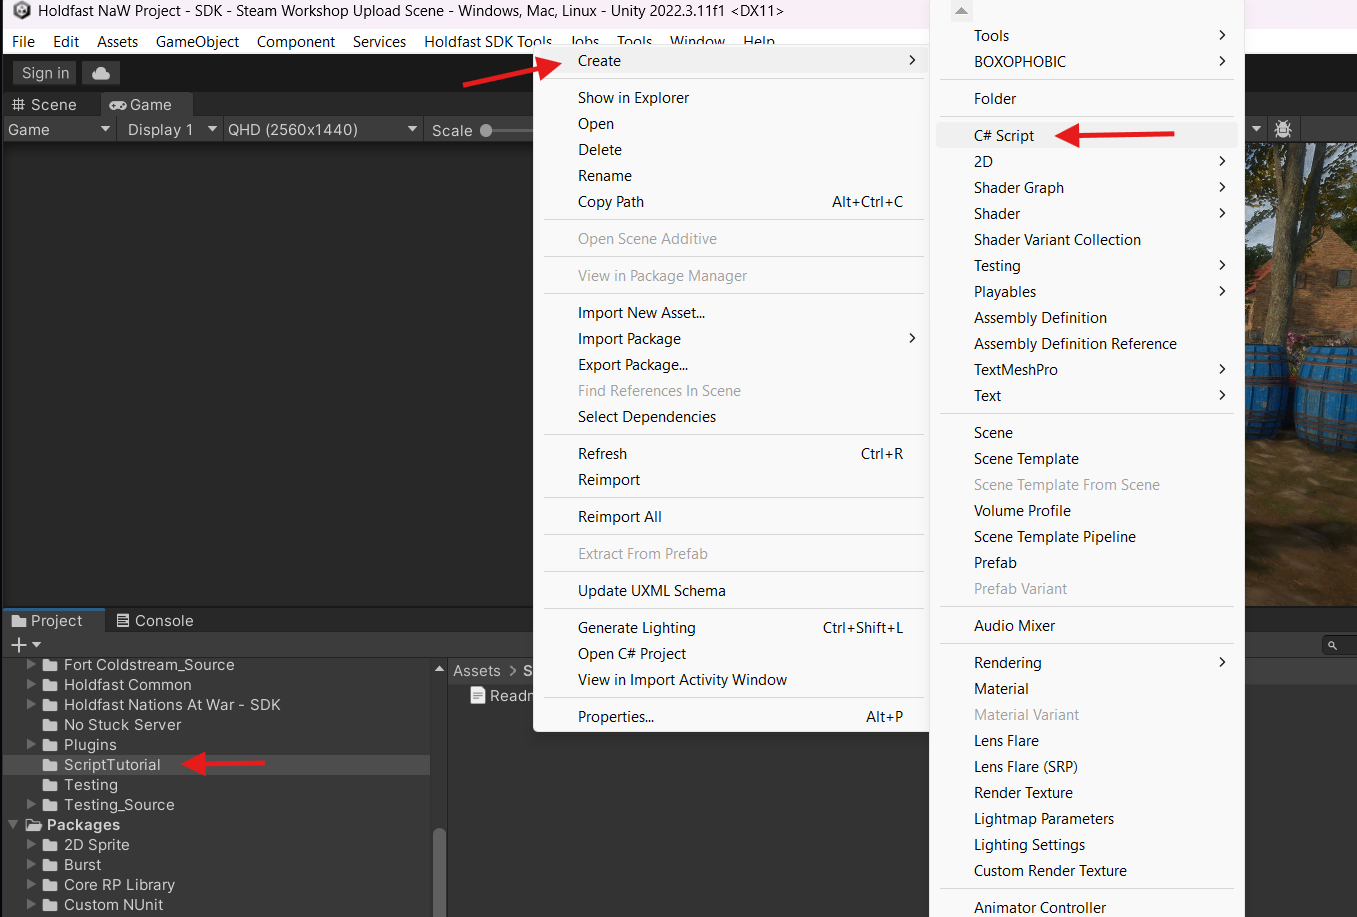
In this mod’s folder create a new script and name it what you named your mod.   
 +
 
 +
[[File:Image 2024-12-03 105007341.png|center|thumb|700x700px]]
 +
[[File:Image 2024-12-03 105229623.png|center|thumb|700x700px]]
 +
 
 +
Double click the script in your Unity Project to open it. 
 +
 
 +
== Core Concepts ==
 +
 
 +
=== Shared Interface ===
 +
The script should implement the shared interface that you're going to be using. Each interface has a few different functions but operates the same.
 +
 
 +
[[Script Modding Guide#IHoldfastGame|IHoldfastGame]], [[Script_Modding_Guide#IHoldfastSharedMethods|IHoldfastSharedMethods]],  [[Script Modding Guide#IHoldfastSharedMethods2|IHoldfastSharedMethods2]],  [[Script Modding Guide#IHoldfastSharedMethods3|IHoldfastSharedMethods3.]]
 +
 
 +
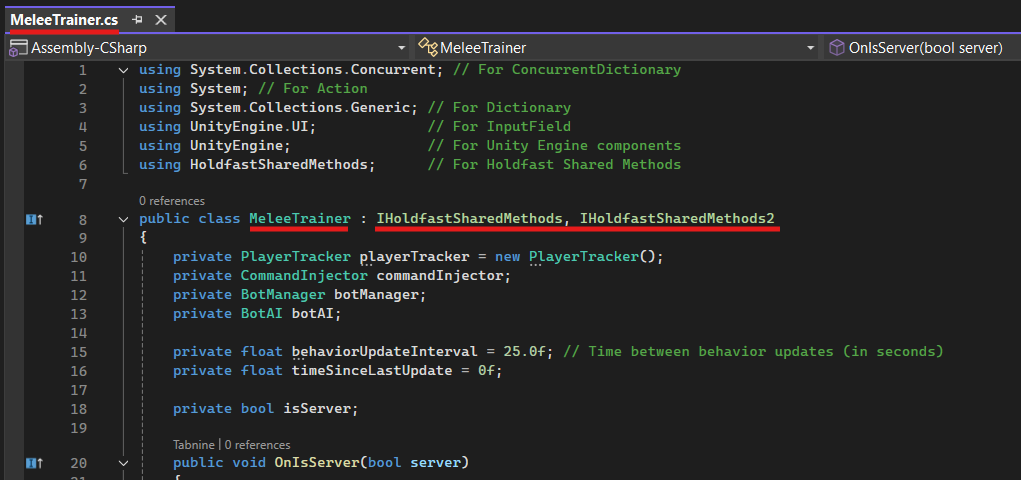
* If you're using multiple IHoldfastSharedMethods, make sure you implement them together at the top of your script.
 +
 
 +
'''Example:''' <code>public class LineFormer : IHoldfastSharedMethods, IHoldfastSharedMethods2, IHoldfastSharedMethods3</code>
 +
 
 +
'''Example:''' Here’s a mod that’s called “LineFormer” that has the script called “LineFormer.cs” which implements the IHoldfastSharedMethods interface.
 +
 
 +
[[File:Script Modding Create Project.png|center|
 +
 
 +
 
 +
]]
 +
 
 +
 
 +
'''Example 2:''' Here’s a mod that’s called “MeleeTrainer” that has the script called “MeleeTrainer.cs” which implements the [[Script_Modding_Guide#IHoldfastSharedMethods|IHoldfastSharedMethods]] & [[Script Modding Guide#IHoldfastSharedMethods2|IHoldfastSharedMethods2]] interfaces.
 +
[[File:Image 2024-12-03 110459063.png|center|thumb|700x700px]]
 +
 
 +
 
 +
=== Client or Server, what are those?! ===
 +
One of the most important concepts to understand while script modifying Holdfast is the concept of "Client" and "Server".
 +
 
 +
The "Server" is the game server which handles all players verification data, networking, chat/voip, etc.
 +
 
 +
Whereas the "Client" is either your own client referred to as the "Owner/Local Player" or someone else referred to as a "Proxy".
 +
 
 +
=== Mod Install and Load Types ===
 +
Similarly to the normal process of using the ‎<code>load_mod <steam_id></code> load type for mods, we've added a <code>load_mod_server_only <steamid></code> which loads a mod specifically only on server side (such as a custom stats tracking or auto admin mod), and a <code>load_mod_client_only <steamid></code> which inversely only loads the mod on client side (such as a ui mod or a audio replacement mod). In addition <code>mods_installed_server_only <steamid></code> was also added. The advantage of this is mods that the client does not need to join the server, the clients won't need to install the mod on their end.
 +
 
 +
The load order for this new feature is first all the Common Mods are loaded and than the client/server specific one's are loaded. As always, the internal order of each list, is dependent on the order of how they were typed in the config file.
 +
 
 +
Please note players can only load mods that the server allows on their list, so a <code>mods_installed_client_only <steamid></code> doesn't make sense, so if you're going to be making a client only loaded mod, it needs to be installed on both the client and the server.
 +
 
 +
=== Mod Variables===
 +
Simply put, mods can receive variables through the PassConfigVariables() method. These variables are supplied in the server config file in the format <code>mod_variable <string></code> for Global Scope (outside of the map rotations) or <code>mod_variable_local <string></code> for Local Scope (inside the map rotation). Global Scope variables will always be loaded BEFORE any local scope variables.
 +
 
 +
Server config mod variables are sent to all mods running on the server. To prevent conflicts where one mod accidentally reads another mod's settings, it is highly recommended to prefix your variables. A common and effective pattern is <code>modID:key:value</code>, where <code>modID</code> is a unique identifier for your mod (like its Steam Workshop ID or a custom prefix).
 +
 
 +
==== Practical Example: Slay Players on Spawn ====
 +
Part 1: The Mod_Variable
 +
mod_variable HardcoreMod:EnableKillOnSpawn:true
 +
 
 +
# <code>HardcoreMod</code>: This is the modID.
 +
# <code>EnableKillOnSpawn</code>: This is the key.
 +
# <code>True</code>: This is the value.
 +
 
 +
Part 2: Script Implementation
 +
 
 +
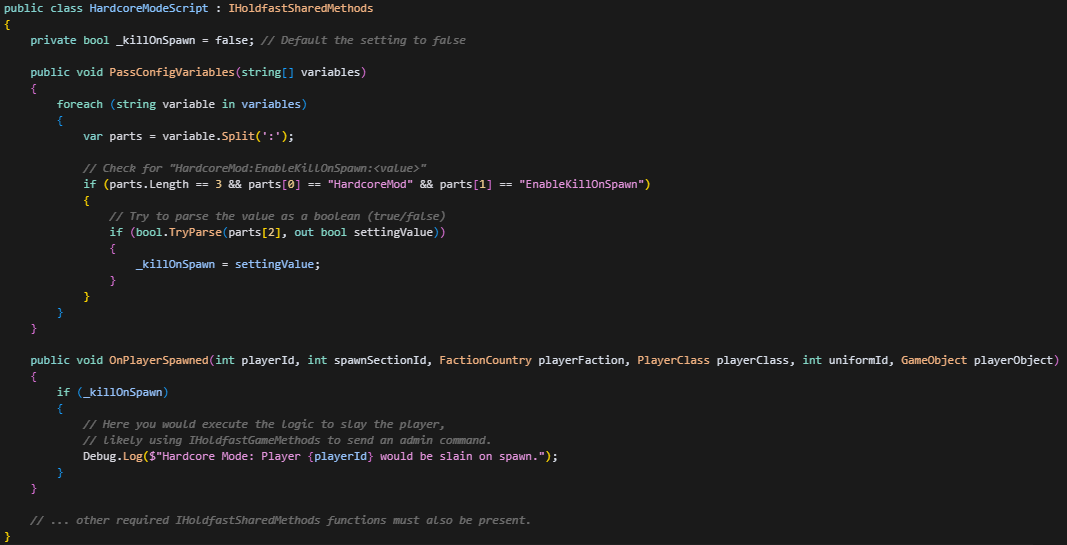
* This script would parse this variable and use its value. This example shows how to safely check for your mod's specific variable and convert the text "true" into a boolean <code>true</code>.
 +
 
 +
[[File:Mod Variables.png|center|thumb|500x500px]]
 +
 
 +
=== Security Concerns ===
 +
 
 +
As you might be aware, we have some security related scripts that, for example don't allow a modder to gain access to the server or client's machine (ie: System.IO, System.Reflection, etc), these typically will show up as an error on the server's console with something along the lines of
 +
[UMod.Scripting.ScriptDomain]: Illegal reference to disallowed namespace: System.Reflection.
 +
 
 +
We've added a feature for server hosts to be able to pass a "-allowRestrictedMods" in the launch parameters of the server. This will turn off the securities on the server machine ONLY, for ALL the mods. As such, if you rent your servers, you will need to talk to your host provider to enable this if they want to support it.
 +
 
 +
What this will allow you to do is hook directly with IO operations and other restricted features (writing files, databases, websites api's, etc) so for development this will open major features that will be able to be done easier or that weren't able to be done outright.
 +
 
 +
=== Gotchya's ===
 +
It's highly recommended that most actions that a mod would do would be defered by a frame or a few ms when it comes to interacting with a player (healing, damaging, reviving, positioning, rotation, etc). If you code something, and it's logically sound, but ingame it's not doing exactly as expected or has bugs occuring due to it, after trying to delay the action, feel free to ask in mod-support.
 +
 
 +
Note, don't use a "static" member inside of the Interface classes. This confuses the dynamic loader of C# and it'll be bad times for you trying to figure out why.
 +
 
 +
= RC commands specific for modding use =
 
=== Make carbon player bots not do any auto input===
 
=== Make carbon player bots not do any auto input===
 
If you plan on modifying bots position or rotation, call the following script to force bots to not auto move or rotate. Note: this is different than setting the carbonplayer [[Remote_Console_Commands#Bot_Commands|forceInputAxis/forceInputRotation]], since thoses ones will lock ALL the bots in the action, whereas this will allow you to individually control bots's facing rotation and movement system.
 
If you plan on modifying bots position or rotation, call the following script to force bots to not auto move or rotate. Note: this is different than setting the carbonplayer [[Remote_Console_Commands#Bot_Commands|forceInputAxis/forceInputRotation]], since thoses ones will lock ALL the bots in the action, whereas this will allow you to individually control bots's facing rotation and movement system.
Line 18: Line 104:
 
Similar to [[Remote_Console_Commands#Game_Settings|drawFirearmTrajectories]], this will send the trajectory data from server to client. Unlike the aforementioned command, this will NOT display it to the player, but the mod will still be recieving the data. Enable this only if you're planning on using the "OnShotInfo" on a client side, for server side mods, this isn't required.
 
Similar to [[Remote_Console_Commands#Game_Settings|drawFirearmTrajectories]], this will send the trajectory data from server to client. Unlike the aforementioned command, this will NOT display it to the player, but the mod will still be recieving the data. Enable this only if you're planning on using the "OnShotInfo" on a client side, for server side mods, this isn't required.
  
  rc set drawFirearmTajectoriesInfo <true/false>
+
  rc set drawFirearmTrajectoriesInfo <true/false>
 +
 
 +
=== Quiet Messages: Server-to-Client Data Transfer ===
 +
Quiet messages are a powerful tool for a server-side mod to send data to a client-side mod without showing anything in the player's chat. They are essential for any mod where the server needs to update a client's custom UI or trigger a client-side action.
  
=== Quiet Messages ===
+
* The communication flow is simple:
These messages will not shown to the player anywhere. The intended use for them is for a server-side mod to be able to communicate to a client side mod.
 
  
For example;
+
# The server executes an rc command to send a string of data.
 +
# The client receives that string from the OnTextMessage event.
  
You have a mod that every time a player presses a button on your mod custom ui, you want to slap a player for 5 damage and they will be shown the message `haha you got slapped by <playername>` on their end of the mod. You are be able to do this by creating a mod that on the player's client side [ie player 3], you have a custom ui panel with a button, which when the button is pressed will send a message to the server (multiple ways of doing this, for example using rc system). This message is than read by the server side mod (could be the same mod, just need conditional logic using the "OnIsServer" and "OnIsClient" to split the mod up) and slaps the targetted player [ie player 5]. Than the server would send a quietPrivateMessage to the slapped target [player 5] informing him that he just got slapped by player 3. The client side of player 5 will than read the quiet private message (using OnTextMessage) and handle it appriopiately.
+
==== Sending Data from the Server ====
  
 +
* Use one of the following commands:
 
  rc serverAdmin quietPrivateMessage <player_id> <message>
 
  rc serverAdmin quietPrivateMessage <player_id> <message>
 +
 
  rc serverAdmin quietBroadcastMessage <message>
 
  rc serverAdmin quietBroadcastMessage <message>
 +
==== Receiving Data on The Client ====
 +
 +
* Your client-side mod will receive the data in the OnTextMessage method. It's crucial to filter these messages to ensure you only process the ones intended for your mod.
 +
 +
* Because OnTextMessage can be used by many different mods simultaneously, you must create a unique message format to avoid conflicts. If you don't, your mod might try to process messages from another mod, leading to errors. A highly recommended pattern is to prefix your messages with a unique ID, like: <code>MOD_ID:COMMAND:VALUE.</code>
 +
 +
==== Practical Example: Welcome Message to a Debug.Log ====
 +
Part 1: The Server-Side Code (Sending the Message) -
 +
 +
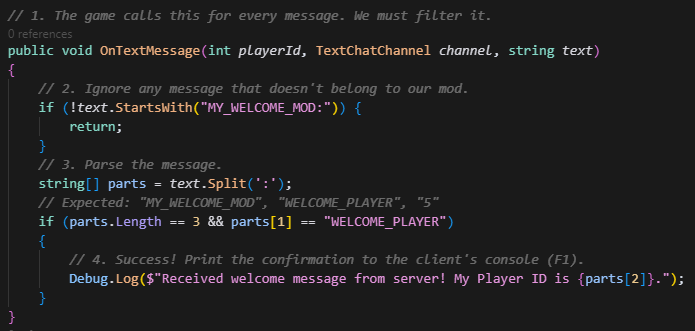
* This code runs on the server. When a player spawns, it sends them a quiet message containing their own PlayerID.
 +
 +
[[File:OnPlayerSpawned.png|center|thumb|500x500px]]
 +
Part 2: The Client-Side Code (Receiving the Message)
 +
 +
* This code runs on every client. It listens for the specific welcome message and logs it.[[File:OnTextMessage.png|center|thumb|500x500px]]
 +
 +
= IHoldfastGame =
 +
To execute RC commands from your script you must gain access one of the game's core methods. This is accomplished by implementing the "IHoldfastGame" interface.
 +
 +
==== Implement the Interface ====
 +
 +
* First, ensure your script is using the HoldfastBridge namespace.
 +
 +
* Your main class signature must then use IHoldfastGame.[[File:HoldfastBridge.png|center|thumb|600x600px]]
 +
 +
==== Receive and Store the Game Methods ====
 +
 +
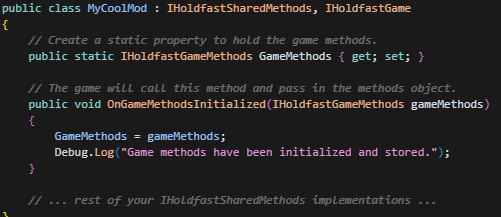
* The IHoldfastGame interface requires you to implement the OnGameMethodsInitialized method. The game engine calls this method once during startup and provides an IHoldfastGameMethods object.
 +
* The best practice is to store this object in a static property. This makes the game methods accessible from anywhere in your mod's codebase without needing to pass references around.
 +
[[File:OnGameMethodsInitialized.png|center|thumb|500x500px]]
 +
 +
==== Execute a Command ====
 +
 +
* With the GameMethods stored, you can now call ExecuteConsoleCommand from any part of your mod.
 +
 +
void ExecuteConsoleCommand(string command, out string output, out bool success);
 +
 +
# <code>command</code>: The RC command string to execute.
 +
# <code>output</code>: An ''out'' parameter that will be filled with any text the command returns. This is very useful for debugging.
 +
# <code>success</code>: An ''out'' parameter that will be '''true''' if the command was recognized and executed successfully.
 +
 +
===== Practical Example: Toggling Mouse Lock for a UI Panel =====
 +
 +
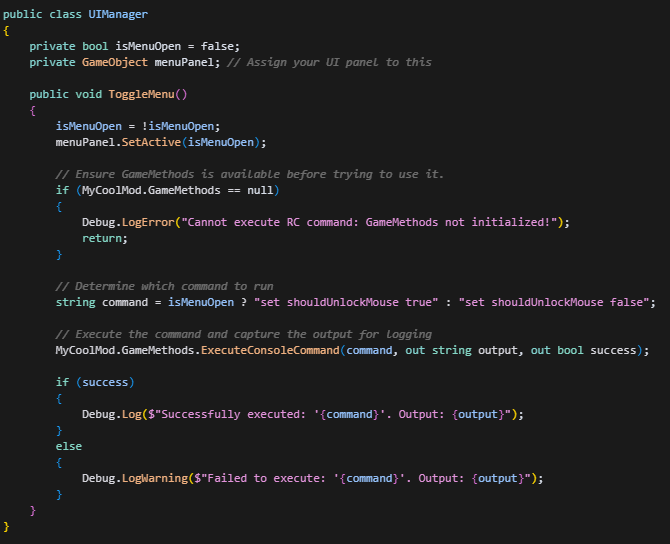
* This is a common use case. When you show a custom UI, you might want to unlock the mouse to the player can interact with it.[[File:ShouldUnlockMouse true.png|center|thumb|600x600px]]
  
 
= IHoldfastSharedMethods =
 
= IHoldfastSharedMethods =
 +
If you hover over the interface's properties in visual studio, these can be found in the inspector too. In case visual studio doesn't link the dll correctly to inspect the data, feel free to refer to the [https://cdn.discordapp.com/attachments/872859509356367962/880762249684324352/HoldfastSharedMethods.rar raw cs files inside the DLL.]
  
 
==== OnSyncValueState ====
 
==== OnSyncValueState ====
Line 66: Line 202:
 
==== PassConfigVariables ====
 
==== PassConfigVariables ====
 
The game will call this once with all the config variables set on the config file of the server.
 
The game will call this once with all the config variables set on the config file of the server.
 +
 
Note: you will receive all variables, so make sure to filter only the ones you care about.
 
Note: you will receive all variables, so make sure to filter only the ones you care about.
 
 
  void PassConfigVariables(string[] value);
 
  void PassConfigVariables(string[] value);
  
Line 77: Line 213:
 
==== OnPlayerLeft ====
 
==== OnPlayerLeft ====
 
The game will call this when a player leaves the round.
 
The game will call this when a player leaves the round.
 +
 
Note: Bots cannot leave, they'll keep respawning once dead.
 
Note: Bots cannot leave, they'll keep respawning once dead.
  
Line 108: Line 245:
 
==== OnShotInfo ====
 
==== OnShotInfo ====
 
The game will call this when a bullet.
 
The game will call this when a bullet.
 +
 
Note: This requires `rc set drawFirearmTajectories true` or `rc set drawFirearmTajectoriesInfo true`.
 
Note: This requires `rc set drawFirearmTajectories true` or `rc set drawFirearmTajectoriesInfo true`.
  
  void OnShotInfo(int playerId, int shotCount, Vector3[][] shotsPointsPositions, float[] trajectileDistances, float[] distanceFromFiringPositions,
+
  void OnShotInfo(int playerId, int shotCount, Vector3[][] shotsPointsPositions, float[] trajectileDistances, float[] distanceFromFiringPositions, float[] horizontalDeviationAngles, float[] maxHorizontalDeviationAngles, float[] muzzleVelocities, float[] gravities, float[] damageHitBaseDamages, float[] damageRangeUnitValues, float[] damagePostTraitAndBuffValues, float[] totalDamages, Vector3[] hitPositions, Vector3[] hitDirections, int[] hitPlayerIds, int[] hitDamageableObjectIds, int[] hitShipIds, int[] hitVehicleIds);
        float[] horizontalDeviationAngles, float[] maxHorizontalDeviationAngles, float[] muzzleVelocities, float[] gravities,
 
        float[] damageHitBaseDamages, float[] damageRangeUnitValues, float[] damagePostTraitAndBuffValues, float[] totalDamages,
 
        Vector3[] hitPositions, Vector3[] hitDirections, int[] hitPlayerIds, int[] hitDamageableObjectIds, int[] hitShipIds, int[] hitVehicleIds);


==== OnPlayerBlock ====
 
==== OnPlayerBlock ====
Line 147: Line 282:
 
==== OnConsoleCommand ====
 
==== OnConsoleCommand ====
 
The game will call this when the console command is used.
 
The game will call this when the console command is used.
 +
 
Note: This will be only called on the client, or on the server that is executing the console command.
 
Note: This will be only called on the client, or on the server that is executing the console command.
  
Line 153: Line 289:
 
==== OnRCLogin ====
 
==== OnRCLogin ====
 
The game will call this when a player requests a remote console login.
 
The game will call this when a player requests a remote console login.
 +
 
Note: This will be called on the client that is executing the request, and the server. Not other people.
 
Note: This will be called on the client that is executing the request, and the server. Not other people.
  
Line 159: Line 296:
 
==== OnRCCommand ====
 
==== OnRCCommand ====
 
The game will call this when a player requests a remote console command.
 
The game will call this when a player requests a remote console command.
 +
 
Note: This will be called on the client that is doing the request, and the server. Not other people.
 
Note: This will be called on the client that is doing the request, and the server. Not other people.
  
Line 181: Line 319:
 
The game will call this when an object is interacted with.
 
The game will call this when an object is interacted with.
  
  void OnInteractableObjectInteraction(int playerId, int interactableObjectId, GameObject interactableObject, InteractionActivationType interactionActivationType,
+
  void OnInteractableObjectInteraction(int playerId, int interactableObjectId, GameObject interactableObject, InteractionActivationType interactionActivationType, int nextActivationStateTransitionIndex);
        int nextActivationStateTransitionIndex);


==== OnEmplacementPlaced ====
 
==== OnEmplacementPlaced ====
Line 211: Line 348:
 
==== OnBuffStart ====
 
==== OnBuffStart ====
 
The game will call this when a buff is applied to a player.
 
The game will call this when a buff is applied to a player.
 +
 
Note: Buffs that already exist on a player may stack, so this call will be called multiple times even if a player already has the buff.
 
Note: Buffs that already exist on a player may stack, so this call will be called multiple times even if a player already has the buff.
  
Line 222: Line 360:
 
==== OnRoundEndFactionWinner ====
 
==== OnRoundEndFactionWinner ====
 
The game will call this when a faction vs faction round is over.
 
The game will call this when a faction vs faction round is over.
 +
 
Note: Most of them except for Army Deathmatch.
 
Note: Most of them except for Army Deathmatch.
  
Line 228: Line 367:
 
==== OnRoundEndPlayerWinner ====
 
==== OnRoundEndPlayerWinner ====
 
The game will call this when a free for all round is over.
 
The game will call this when a free for all round is over.
 +
 
Note: Only Army Deathmatch.
 
Note: Only Army Deathmatch.
  
Line 257: Line 397:
 
  void OnShipDamaged(int shipId, int oldHp, int newHp);
 
  void OnShipDamaged(int shipId, int oldHp, int newHp);
  
= Examples =
+
= IHoldfastSharedMethods2 =
 +
==== OnPlayerPacket====
 +
This will be called every time we get a packet from a user.
 +
 
 +
Note: Server Side ONLY.
 +
 
 +
void OnPlayerPacket(int playerId, byte? instance, Vector3? ownerPosition, double? packetTimestamp, Vector2? ownerInputAxis, float? ownerRotationY, float? ownerPitch, float? ownerYaw, PlayerActions[] actionCollection, Vector3? cameraPosition, Vector3? cameraForward, ushort? shipID, bool swimming);
 +
 
 +
==== OnVehiclePacket ====
 +
This will be called every time we get a packet from a vehicle.
 +
 
 +
Note: Server Side ONLY.
 +
 
 +
void OnVehiclePacket(int vehicleId, Vector2 inputAxis, bool shift, bool strafe, PlayerVehicleActions[] actionCollection);
 +
 
 +
==== OnOfficerOrderStart ====
 +
This will be called every time we get a officer order.
 +
 
 +
void OnOfficerOrderStart(int officerPlayerId, HighCommandOrderType officerOrderType, Vector3 orderPosition, float orderRotationY, int voicePhraseRandomIndex);
 +
 
 +
==== OnOfficerOrderStop ====
 +
This will be called every time we get a officer order stop.
 +
 
 +
void OnOfficerOrderStop(int officerPlayerId, HighCommandOrderType officerOrderType);
 +
 
 +
= IHoldfastSharedMethods3 =
 +
 
 +
==== OnStartSpectate ====
 +
This will be called when a player starts spectating someone else.
 +
void OnStartSpectate(int playerId, int spectatedPlayerId);
 +
 
 +
==== OnStopSpectate ====
 +
This will be called when a player stops spectating.
 +
void OnStopSpectate(int playerId, int spectatedPlayerId);
 +
 
 +
==== OnStartFreeflight ====
 +
This will be called when a player starts using freeflight cam.
 +
void OnStartFreeflight(int playerId);
 +
 
 +
==== OnStopFreeflight ====
 +
This will be called when a player stops using freeflight cam.
 +
void OnStopFreeflight(int playerId);
 +
 
 +
==== OnMeleeArenaRoundEndFactionWinner ====
 +
This will be called on a melee arena round end depending on who wins the round.
 +
void OnMeleeArenaRoundEndFactionWinner(int roundId, bool attackers);
 +
 
 +
==== OnPlayerConnected ====
 +
This will be called when a player connects to a server.
 +
 
 +
This is the normal flow: OnPlayerConnected -&amp;gt; tell the player to loading screen -&amp;gt; player picks faction+class -&amp;gt; OnPlayerJoined
 +
 
 +
Note: Server Only.
 +
void OnPlayerConnected(int playerId, bool isAutoAdmin, string backendId);
 +
 
 +
==== OnPlayerDisconnected ====
 +
This will be called when a player leaves a server.
 +
 
 +
Unlike OnPlayerLeave, this happens even on people that didn't spawn in
 +
 
 +
Note: Server Only.
 +
void OnPlayerDisconnected(int playerId);
 +
 
 +
= SharedMethods Copy/Paste =
 +
Here is a file that has all the SharedMethods in a single file so you can copy paste them easily.
 +
 
 +
https://github.com/Xarkanoth/Holdfast-Scripts/tree/main/IHoldfastSharedMethods
 +
 
 +
= Key Scene GameObjects =
 +
When developing client-side mods, you will often need to find and interact with specific <code>GameObjects</code> that are part of the game's scene. Knowing the names of these objects and how to access them is essential for tasks like creating custom UI and manipulating cameras.
 +
 
 +
Note: GameObject names can change at any time with no update regarding the name change.
 +
 
 +
==== The Main Camera: <code>Main Camera SCENE</code> ====
 +
This is the primary camera that renders the player's view. You might interact with it to get its position, change its field of view, or attach custom visual effects.
 +
 
 +
* Name: <code>Main Camera SCENE</code>
 +
* Example: Finding the Main Camera
 +
 
 +
[[File:Main Camera SCENE.png|center|thumb|482x482px]]
 +
 
 +
==== The Main UI Canvas: <code>Main Canvas</code> ====
 +
This GameObject is the root of most of Holdfast's user interface. If you want to add your own UI elements (like panels, text, or images), you will typically make them children of this canvas to ensure they are rendered correctly on the player's screen.
 +
 
 +
* Name: <code>Main Canvas</code>
 +
* Example: Finding the Main Canvas
 +
 
 +
[[File:Finding Main Canvas.png|center|thumb|450x450px]]
 +
 
 +
=== ClientScene GameObjects ===
 +
{| class="wikitable"
 +
!Name
 +
!Under
 +
!Description
 +
|-
 +
|Post Processing Global Volume
 +
|ClientScene
 +
|
 +
|-
 +
|MasterAudio - Client Scene
 +
|ClientScene
 +
|
 +
|-
 +
|Nature Renderer Global Settings
 +
|ClientScene
 +
|
 +
|-
 +
|Scripts
 +
|ClientScene
 +
|
 +
|-
 +
|Audio Listener
 +
|ClientScene
 +
|
 +
|-
 +
|WindZone
 +
|ClientScene
 +
|
 +
|-
 +
|Camera - Client
 +
|ClientScene
 +
|
 +
|-
 +
|Main Canvas
 +
|ClientScene
 +
|The UI panel that players see in-game.
 +
|-
 +
|Menu Canvas
 +
|ClientScene
 +
|
 +
|}
 +
 
 +
=== Main Canvas GameObjects ===
 +
{| class="wikitable sortable mw-collapsible"
 +
!Name
 +
!Description
 +
|-
 +
|Player Name Tags
 +
|
 +
|-
 +
|Priority Name Tag Canvas
 +
|
 +
|-
 +
|Spyglass Lens Panel
 +
|
 +
|-
 +
|Settings Loading Black Background
 +
|
 +
|-
 +
|End of Round Panel
 +
|
 +
|-
 +
|End of Match Panel
 +
|
 +
|-
 +
|End of Match Panel
 +
|
 +
|-
 +
|Game Elements Panel
 +
|
 +
|-
 +
|New Player Joined Notification Panel
 +
|
 +
|-
 +
|Free Roam Panel
 +
|
 +
|-
 +
|Death Screen Panel
 +
|
 +
|-
 +
|Spectating Panel
 +
|
 +
|-
 +
|Top Info Bar
 +
|Turning off the Top Info Bar will result in it being turned back on automatically.
 +
|-
 +
|Kill Log Panel
 +
|
 +
|-
 +
|UI Proxy Player Card Container Panel
 +
|
 +
|-
 +
|Main Respawn Timer Container
 +
|
 +
|-
 +
|P Menu Panel
 +
|
 +
|-
 +
|Round Players Control Panel - Dialog Box
 +
|
 +
|-
 +
|Report Submitted Popup
 +
|
 +
|-
 +
|New Scoreboard Panel
 +
|
 +
|-
 +
|Round End Panel
 +
|
 +
|-
 +
|New Chat Panel
 +
|
 +
|-
 +
|VOIP Elements Panel
 +
|
 +
|-
 +
|Poll Voting Panel
 +
|
 +
|-
 +
|In-game Server Details Panel
 +
|
 +
|-
 +
|Controls Notification Popup
 +
|
 +
|}
 +
 
 +
=== Menu Canvas GameObjects ===
 +
{| class="wikitable sortable mw-collapsible"
 +
!Name
 +
!Description
 +
|-
 +
|Main Screen Panels
 +
|
 +
|-
 +
|IntroInfo Panel
 +
|
 +
|-
 +
|Game Console Panel
 +
|
 +
|-
 +
|Settings Loading Panel Overlay
 +
|
 +
|-
 +
|Tooltip Panel
 +
|
 +
|-
 +
|Loading Screen Panel
 +
|
 +
|}
 +
 
 +
= Code Examples & Resources =
  
 
=====AGS's Misc Examples=====
 
=====AGS's Misc Examples=====
 
https://github.com/CM2Walki/HoldfastMods
 
https://github.com/CM2Walki/HoldfastMods
  
=====Elf's AutoAdmin=====
+
===== Elf's Custom Factions =====
https://github.com/LoganBlinco/HF_AutoAdmin
+
https://github.com/LoganBlinco/BaseCustomFactionMod
 +
 
 +
[[Custom Factions#Replacing Factions]]
 +
 
 +
=====Spammy's Chat Filter=====
 +
https://github.com/AgentNo/holdfast-scripts-and-configs/blob/main/scripts/spammys_chat_filter/SpammyChatFilter.cs
 +
 
 +
=====Spammy's OwO Slapper=====
 +
https://github.com/AgentNo/holdfast-scripts-and-configs/blob/main/scripts/no_uwu_allowed/TestScriptMod.cs
 +
 
 +
===== Xarkanoth's Examples =====
 +
https://github.com/Xarkanoth/Holdfast-Scripts
  
 
Feel free to post in the [http://www.discord.gg/holdfastgame Official Holdfast Discord] #Mod-Support for any help
 
Feel free to post in the [http://www.discord.gg/holdfastgame Official Holdfast Discord] #Mod-Support for any help
 +
 +
= Support =
 +
Got a question that's not covered in this documentation?
 +
 +
We will gladly give you a helping hand should you require, so don't shy away from asking any questions. You will also find members within the community familiar with the toolset willing to do so.
 +
Join the Official Discord then apply for the 'Artisan' role by selecting the art emoji in the #getting-started channel. This will unlock all channels concerning the discussion of modifications and scripting.
 +
 +
[https://discord.com/invite/holdfastgame Discord - Holdfast Workshop]

Latest revision as of 16:01, 22 June 2025

Getting Started

Basic knowledge of C# and Unity is required.

Setting Up Your Environment

Connecting Unity to your editor

Make sure your Unity Editor is connected to whatever you're using to write the script. (Example: Visual Studio Community)

In the Unity Editor, click Edit -> Preferences -> External Tools -> External Script Editor -> Visual Studio Community.

Restart both your Unity Editor and your Script Editor to make sure these changes take affect.

Creating your mod

Create a new mod and name it whatever your script does.

In the Unity Editor click Holdfast SDK Tools -> Create Empty Mod

Image 2024-12-03 104649232.png

In this mod’s folder create a new script and name it what you named your mod.

Image 2024-12-03 105007341.png
Image 2024-12-03 105229623.png

Double click the script in your Unity Project to open it.

Core Concepts

Shared Interface

The script should implement the shared interface that you're going to be using. Each interface has a few different functions but operates the same.

IHoldfastGame, IHoldfastSharedMethods, IHoldfastSharedMethods2, IHoldfastSharedMethods3.

  • If you're using multiple IHoldfastSharedMethods, make sure you implement them together at the top of your script.

Example: public class LineFormer : IHoldfastSharedMethods, IHoldfastSharedMethods2, IHoldfastSharedMethods3

Example: Here’s a mod that’s called “LineFormer” that has the script called “LineFormer.cs” which implements the IHoldfastSharedMethods interface.

Script Modding Create Project.png


Example 2: Here’s a mod that’s called “MeleeTrainer” that has the script called “MeleeTrainer.cs” which implements the IHoldfastSharedMethods & IHoldfastSharedMethods2 interfaces.

Image 2024-12-03 110459063.png


Client or Server, what are those?!

One of the most important concepts to understand while script modifying Holdfast is the concept of "Client" and "Server".

The "Server" is the game server which handles all players verification data, networking, chat/voip, etc.

Whereas the "Client" is either your own client referred to as the "Owner/Local Player" or someone else referred to as a "Proxy".

Mod Install and Load Types

Similarly to the normal process of using the ‎load_mod <steam_id> load type for mods, we've added a load_mod_server_only <steamid> which loads a mod specifically only on server side (such as a custom stats tracking or auto admin mod), and a load_mod_client_only <steamid> which inversely only loads the mod on client side (such as a ui mod or a audio replacement mod). In addition mods_installed_server_only <steamid> was also added. The advantage of this is mods that the client does not need to join the server, the clients won't need to install the mod on their end.

The load order for this new feature is first all the Common Mods are loaded and than the client/server specific one's are loaded. As always, the internal order of each list, is dependent on the order of how they were typed in the config file.

Please note players can only load mods that the server allows on their list, so a mods_installed_client_only <steamid> doesn't make sense, so if you're going to be making a client only loaded mod, it needs to be installed on both the client and the server.

Mod Variables

Simply put, mods can receive variables through the PassConfigVariables() method. These variables are supplied in the server config file in the format mod_variable <string> for Global Scope (outside of the map rotations) or mod_variable_local <string> for Local Scope (inside the map rotation). Global Scope variables will always be loaded BEFORE any local scope variables.

Server config mod variables are sent to all mods running on the server. To prevent conflicts where one mod accidentally reads another mod's settings, it is highly recommended to prefix your variables. A common and effective pattern is modID:key:value, where modID is a unique identifier for your mod (like its Steam Workshop ID or a custom prefix).

Practical Example: Slay Players on Spawn

Part 1: The Mod_Variable

mod_variable HardcoreMod:EnableKillOnSpawn:true
  1. HardcoreMod: This is the modID.
  2. EnableKillOnSpawn: This is the key.
  3. True: This is the value.

Part 2: Script Implementation

  • This script would parse this variable and use its value. This example shows how to safely check for your mod's specific variable and convert the text "true" into a boolean true.
Mod Variables.png

Security Concerns

As you might be aware, we have some security related scripts that, for example don't allow a modder to gain access to the server or client's machine (ie: System.IO, System.Reflection, etc), these typically will show up as an error on the server's console with something along the lines of

[UMod.Scripting.ScriptDomain]: Illegal reference to disallowed namespace: System.Reflection.

We've added a feature for server hosts to be able to pass a "-allowRestrictedMods" in the launch parameters of the server. This will turn off the securities on the server machine ONLY, for ALL the mods. As such, if you rent your servers, you will need to talk to your host provider to enable this if they want to support it.

What this will allow you to do is hook directly with IO operations and other restricted features (writing files, databases, websites api's, etc) so for development this will open major features that will be able to be done easier or that weren't able to be done outright.

Gotchya's

It's highly recommended that most actions that a mod would do would be defered by a frame or a few ms when it comes to interacting with a player (healing, damaging, reviving, positioning, rotation, etc). If you code something, and it's logically sound, but ingame it's not doing exactly as expected or has bugs occuring due to it, after trying to delay the action, feel free to ask in mod-support.

Note, don't use a "static" member inside of the Interface classes. This confuses the dynamic loader of C# and it'll be bad times for you trying to figure out why.

RC commands specific for modding use

Make carbon player bots not do any auto input

If you plan on modifying bots position or rotation, call the following script to force bots to not auto move or rotate. Note: this is different than setting the carbonplayer forceInputAxis/forceInputRotation, since thoses ones will lock ALL the bots in the action, whereas this will allow you to individually control bots's facing rotation and movement system.

rc carbonPlayers ignoreAutoControls <true/false>

Send network trajectory info to client without showing it to players

Similar to drawFirearmTrajectories, this will send the trajectory data from server to client. Unlike the aforementioned command, this will NOT display it to the player, but the mod will still be recieving the data. Enable this only if you're planning on using the "OnShotInfo" on a client side, for server side mods, this isn't required.

rc set drawFirearmTrajectoriesInfo <true/false>

Quiet Messages: Server-to-Client Data Transfer

Quiet messages are a powerful tool for a server-side mod to send data to a client-side mod without showing anything in the player's chat. They are essential for any mod where the server needs to update a client's custom UI or trigger a client-side action.

  • The communication flow is simple:
  1. The server executes an rc command to send a string of data.
  2. The client receives that string from the OnTextMessage event.

Sending Data from the Server

  • Use one of the following commands:
rc serverAdmin quietPrivateMessage <player_id> <message>
rc serverAdmin quietBroadcastMessage <message>

Receiving Data on The Client

  • Your client-side mod will receive the data in the OnTextMessage method. It's crucial to filter these messages to ensure you only process the ones intended for your mod.
  • Because OnTextMessage can be used by many different mods simultaneously, you must create a unique message format to avoid conflicts. If you don't, your mod might try to process messages from another mod, leading to errors. A highly recommended pattern is to prefix your messages with a unique ID, like: MOD_ID:COMMAND:VALUE.

Practical Example: Welcome Message to a Debug.Log

Part 1: The Server-Side Code (Sending the Message) -

  • This code runs on the server. When a player spawns, it sends them a quiet message containing their own PlayerID.
OnPlayerSpawned.png

Part 2: The Client-Side Code (Receiving the Message)

  • This code runs on every client. It listens for the specific welcome message and logs it.
    OnTextMessage.png

IHoldfastGame

To execute RC commands from your script you must gain access one of the game's core methods. This is accomplished by implementing the "IHoldfastGame" interface.

Implement the Interface

  • First, ensure your script is using the HoldfastBridge namespace.
  • Your main class signature must then use IHoldfastGame.
    HoldfastBridge.png

Receive and Store the Game Methods

  • The IHoldfastGame interface requires you to implement the OnGameMethodsInitialized method. The game engine calls this method once during startup and provides an IHoldfastGameMethods object.
  • The best practice is to store this object in a static property. This makes the game methods accessible from anywhere in your mod's codebase without needing to pass references around.
OnGameMethodsInitialized.png

Execute a Command

  • With the GameMethods stored, you can now call ExecuteConsoleCommand from any part of your mod.
void ExecuteConsoleCommand(string command, out string output, out bool success);
  1. command: The RC command string to execute.
  2. output: An out parameter that will be filled with any text the command returns. This is very useful for debugging.
  3. success: An out parameter that will be true if the command was recognized and executed successfully.
Practical Example: Toggling Mouse Lock for a UI Panel
  • This is a common use case. When you show a custom UI, you might want to unlock the mouse to the player can interact with it.
    ShouldUnlockMouse true.png

IHoldfastSharedMethods

If you hover over the interface's properties in visual studio, these can be found in the inspector too. In case visual studio doesn't link the dll correctly to inspect the data, feel free to refer to the raw cs files inside the DLL.

OnSyncValueState

The game will share an int when the mod loads. A random synchronized value (same on client and server), for example useful if you need a seed for a map generator.

void OnSyncValueState(int value);

OnUpdateSyncedTime

The game will share the current synchronized time (same on client and server) on every frame of the game.

void OnUpdateSyncedTime(double time);

OnUpdateElapsedTime

The game will return the seconds since the round started on every frame of the game.

void OnUpdateElapsedTime(float time);

OnUpdateTimeRemaining

The game will share the current remaining time on every frame of the game.

void OnUpdateTimeRemaining(float time);

OnIsServer

The game will return if the mod is loaded on a server.

void OnIsServer(bool server);

OnIsClient

The game will return if the mod is loaded on a client, if it is, you'll retrieve the current player's steam id.

void OnIsClient(bool client, ulong steamId);

OnRoundDetails

The game will call this on round start with details regarding the current round.

void OnRoundDetails(int roundId, string serverName, string mapName, FactionCountry attackingFaction, FactionCountry defendingFaction, GameplayMode gameplayMode, GameType gameType);

PassConfigVariables

The game will call this once with all the config variables set on the config file of the server.

Note: you will receive all variables, so make sure to filter only the ones you care about.

void PassConfigVariables(string[] value);

OnPlayerJoined

The game will call this when a player or a bot joins the round.

void OnPlayerJoined(int playerId, ulong steamId, string name, string regimentTag, bool isBot);

OnPlayerLeft

The game will call this when a player leaves the round.

Note: Bots cannot leave, they'll keep respawning once dead.

void OnPlayerLeft(int playerId);

OnPlayerSpawned

The game will call this when a player spawns in game.

void OnPlayerSpawned(int playerId, int spawnSectionId, FactionCountry playerFaction, PlayerClass playerClass, int uniformId, GameObject playerObject);

OnPlayerHurt

The game will call this when a player is hurt in game.

void OnPlayerHurt(int playerId, byte oldHp, byte newHp, EntityHealthChangedReason reason);

OnPlayerKilledPlayer

The game will call this when a player is killed by another player.

void OnPlayerKilledPlayer(int killerPlayerId, int victimPlayerId, EntityHealthChangedReason reason, string details);

OnScorableAction

The game will call this when a player receives any score.

void OnScorableAction(int playerId, int score, ScorableActionType reason);

OnPlayerShoot

The game will call this when a player shoots his gun.

void OnPlayerShoot(int playerId, bool dryShot);

OnShotInfo

The game will call this when a bullet.

Note: This requires `rc set drawFirearmTajectories true` or `rc set drawFirearmTajectoriesInfo true`.

void OnShotInfo(int playerId, int shotCount, Vector3[][] shotsPointsPositions, float[] trajectileDistances, float[] distanceFromFiringPositions, float[] horizontalDeviationAngles, float[] maxHorizontalDeviationAngles, float[] muzzleVelocities, float[] gravities, float[] damageHitBaseDamages, float[] damageRangeUnitValues, float[] damagePostTraitAndBuffValues, float[] totalDamages, Vector3[] hitPositions, Vector3[] hitDirections, int[] hitPlayerIds, int[] hitDamageableObjectIds, int[] hitShipIds, int[] hitVehicleIds);

OnPlayerBlock

The game will call this when a player successfully blocks another player.

void OnPlayerBlock(int attackingPlayerId, int defendingPlayerId);

OnPlayerMeleeStartSecondaryAttack

The game will call this when a player starts a secondary attack (shove).

void OnPlayerMeleeStartSecondaryAttack(int playerId);

OnPlayerWeaponSwitch

The game will call this when a player swaps their weapon.

void OnPlayerWeaponSwitch(int playerId, string weapon);

OnPlayerStartCarry

The game will call this when a player starts carrying an object.

void OnPlayerStartCarry(int playerId, CarryableObjectType carryableObject);

OnPlayerEndCarry

The game will call this when a player stops carrying an object.

void OnPlayerEndCarry(int playerId);

OnPlayerShout

The game will call this when a player shouts using the ingame voice commands(not voip).

void OnPlayerShout(int playerId, CharacterVoicePhrase voicePhrase);

OnConsoleCommand

The game will call this when the console command is used.

Note: This will be only called on the client, or on the server that is executing the console command.

void OnConsoleCommand(string input, string output, bool success);

OnRCLogin

The game will call this when a player requests a remote console login.

Note: This will be called on the client that is executing the request, and the server. Not other people.

void OnRCLogin(int playerId, string inputPassword, bool isLoggedIn);

OnRCCommand

The game will call this when a player requests a remote console command.

Note: This will be called on the client that is doing the request, and the server. Not other people.

void OnRCCommand(int playerId, string input, string output, bool success);

OnTextMessage

The game will call this when a message is received in the chat system.

void OnTextMessage(int playerId, TextChatChannel channel, string text);

OnAdminPlayerAction

The game will call this when an administrator does an admin action using the rc commands or the P menu.

void OnAdminPlayerAction(int playerId, int adminId, ServerAdminAction action, string reason);

OnDamageableObjectDamaged

The game will call this when an object is damaged.

void OnDamageableObjectDamaged(GameObject damageableObject, int damageableObjectId, int shipId, int oldHp, int newHp);

OnInteractableObjectInteraction

The game will call this when an object is interacted with.

void OnInteractableObjectInteraction(int playerId, int interactableObjectId, GameObject interactableObject, InteractionActivationType interactionActivationType, int nextActivationStateTransitionIndex);

OnEmplacementPlaced

The game will call this when an emplacement (sapper object) is initially placed.

void OnEmplacementPlaced(int itemId, GameObject objectBuilt, EmplacementType emplacementType);

OnEmplacementConstructed

The game will call this when an emplacement (sapper object) is fully constructed.

void OnEmplacementConstructed(int itemId);

OnCapturePointCaptured

The game will call this when a capture point is fully captured.

void OnCapturePointCaptured(int capturePoint);

OnCapturePointOwnerChanged

The game will call this when a capture point changes owner.

void OnCapturePointOwnerChanged(int capturePoint, FactionCountry factionCountry);

OnCapturePointDataUpdated

The game will call this when a capture data changes.

void OnCapturePointDataUpdated(int capturePoint, int defendingPlayerCount, int attackingPlayerCount);

OnBuffStart

The game will call this when a buff is applied to a player.

Note: Buffs that already exist on a player may stack, so this call will be called multiple times even if a player already has the buff.

void OnBuffStart(int playerId, BuffType buff);

OnBuffStop

The game will call this when a buff is removed from a player.

void OnBuffStop(int playerId, BuffType buff);

OnRoundEndFactionWinner

The game will call this when a faction vs faction round is over.

Note: Most of them except for Army Deathmatch.

void OnRoundEndFactionWinner(FactionCountry factionCountry, FactionRoundWinnerReason reason);

OnRoundEndPlayerWinner

The game will call this when a free for all round is over.

Note: Only Army Deathmatch.

void OnRoundEndPlayerWinner(int playerId);

OnVehicleSpawned

The game will call this when a vehicle(horse) is spawned.

void OnVehicleSpawned(int vehicleId, FactionCountry vehicleFaction, PlayerClass vehicleClass, GameObject vehicleObject, int ownerPlayerId);

OnVehicleHurt

The game will call this when a vehicle(horse) is hurt.

void OnVehicleHurt(int vehicleId, byte oldHp, byte newHp, EntityHealthChangedReason reason);

OnPlayerKilledVehicle

The game will call this when a vehicle(horse) is killed by a player.

void OnPlayerKilledVehicle(int killerPlayerId, int victimVehicleId, EntityHealthChangedReason reason, string details);

OnShipSpawned

The game will call this when a ship is spawned.

void OnShipSpawned(int shipId, GameObject shipObject, FactionCountry shipfaction, ShipType shipType, int shipName);

OnShipDamaged

The game will call this when a ship takes damage.

void OnShipDamaged(int shipId, int oldHp, int newHp);

IHoldfastSharedMethods2

OnPlayerPacket

This will be called every time we get a packet from a user.

Note: Server Side ONLY.

void OnPlayerPacket(int playerId, byte? instance, Vector3? ownerPosition, double? packetTimestamp, Vector2? ownerInputAxis, float? ownerRotationY, float? ownerPitch, float? ownerYaw, PlayerActions[] actionCollection, Vector3? cameraPosition, Vector3? cameraForward, ushort? shipID, bool swimming);

OnVehiclePacket

This will be called every time we get a packet from a vehicle.

Note: Server Side ONLY.

void OnVehiclePacket(int vehicleId, Vector2 inputAxis, bool shift, bool strafe, PlayerVehicleActions[] actionCollection);

OnOfficerOrderStart

This will be called every time we get a officer order.

void OnOfficerOrderStart(int officerPlayerId, HighCommandOrderType officerOrderType, Vector3 orderPosition, float orderRotationY, int voicePhraseRandomIndex);

OnOfficerOrderStop

This will be called every time we get a officer order stop.

void OnOfficerOrderStop(int officerPlayerId, HighCommandOrderType officerOrderType);

IHoldfastSharedMethods3

OnStartSpectate

This will be called when a player starts spectating someone else.

void OnStartSpectate(int playerId, int spectatedPlayerId);

OnStopSpectate

This will be called when a player stops spectating.

void OnStopSpectate(int playerId, int spectatedPlayerId);

OnStartFreeflight

This will be called when a player starts using freeflight cam.

void OnStartFreeflight(int playerId);

OnStopFreeflight

This will be called when a player stops using freeflight cam.

void OnStopFreeflight(int playerId);

OnMeleeArenaRoundEndFactionWinner

This will be called on a melee arena round end depending on who wins the round.

void OnMeleeArenaRoundEndFactionWinner(int roundId, bool attackers);

OnPlayerConnected

This will be called when a player connects to a server.

This is the normal flow: OnPlayerConnected -&gt; tell the player to loading screen -&gt; player picks faction+class -&gt; OnPlayerJoined

Note: Server Only.

void OnPlayerConnected(int playerId, bool isAutoAdmin, string backendId);

OnPlayerDisconnected

This will be called when a player leaves a server.

Unlike OnPlayerLeave, this happens even on people that didn't spawn in

Note: Server Only.

void OnPlayerDisconnected(int playerId);

SharedMethods Copy/Paste

Here is a file that has all the SharedMethods in a single file so you can copy paste them easily.

https://github.com/Xarkanoth/Holdfast-Scripts/tree/main/IHoldfastSharedMethods

Key Scene GameObjects

When developing client-side mods, you will often need to find and interact with specific GameObjects that are part of the game's scene. Knowing the names of these objects and how to access them is essential for tasks like creating custom UI and manipulating cameras.

Note: GameObject names can change at any time with no update regarding the name change.

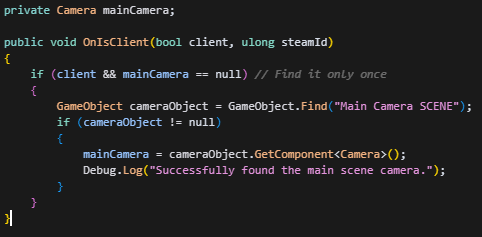
The Main Camera: Main Camera SCENE

This is the primary camera that renders the player's view. You might interact with it to get its position, change its field of view, or attach custom visual effects.

  • Name: Main Camera SCENE
  • Example: Finding the Main Camera
Main Camera SCENE.png

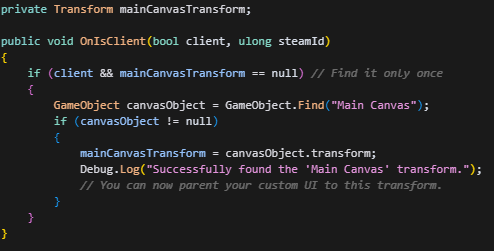
The Main UI Canvas: Main Canvas

This GameObject is the root of most of Holdfast's user interface. If you want to add your own UI elements (like panels, text, or images), you will typically make them children of this canvas to ensure they are rendered correctly on the player's screen.

  • Name: Main Canvas
  • Example: Finding the Main Canvas
Finding Main Canvas.png

ClientScene GameObjects

Name Under Description
Post Processing Global Volume ClientScene
MasterAudio - Client Scene ClientScene
Nature Renderer Global Settings ClientScene
Scripts ClientScene
Audio Listener ClientScene
WindZone ClientScene
Camera - Client ClientScene
Main Canvas ClientScene The UI panel that players see in-game.
Menu Canvas ClientScene

Main Canvas GameObjects

Name Description
Player Name Tags
Priority Name Tag Canvas
Spyglass Lens Panel
Settings Loading Black Background
End of Round Panel
End of Match Panel
End of Match Panel
Game Elements Panel
New Player Joined Notification Panel
Free Roam Panel
Death Screen Panel
Spectating Panel
Top Info Bar Turning off the Top Info Bar will result in it being turned back on automatically.
Kill Log Panel
UI Proxy Player Card Container Panel
Main Respawn Timer Container
P Menu Panel
Round Players Control Panel - Dialog Box
Report Submitted Popup
New Scoreboard Panel
Round End Panel
New Chat Panel
VOIP Elements Panel
Poll Voting Panel
In-game Server Details Panel
Controls Notification Popup

Menu Canvas GameObjects

Name Description
Main Screen Panels
IntroInfo Panel
Game Console Panel
Settings Loading Panel Overlay
Tooltip Panel
Loading Screen Panel

Code Examples & Resources

AGS's Misc Examples

https://github.com/CM2Walki/HoldfastMods

Elf's Custom Factions

https://github.com/LoganBlinco/BaseCustomFactionMod

Custom Factions#Replacing Factions

Spammy's Chat Filter

https://github.com/AgentNo/holdfast-scripts-and-configs/blob/main/scripts/spammys_chat_filter/SpammyChatFilter.cs

Spammy's OwO Slapper

https://github.com/AgentNo/holdfast-scripts-and-configs/blob/main/scripts/no_uwu_allowed/TestScriptMod.cs

Xarkanoth's Examples

https://github.com/Xarkanoth/Holdfast-Scripts

Feel free to post in the Official Holdfast Discord #Mod-Support for any help

Support

Got a question that's not covered in this documentation?

We will gladly give you a helping hand should you require, so don't shy away from asking any questions. You will also find members within the community familiar with the toolset willing to do so. Join the Official Discord then apply for the 'Artisan' role by selecting the art emoji in the #getting-started channel. This will unlock all channels concerning the discussion of modifications and scripting.

Discord - Holdfast Workshop